How to create and edit tags
In this tutorial you will learn how to create custom trade tags.
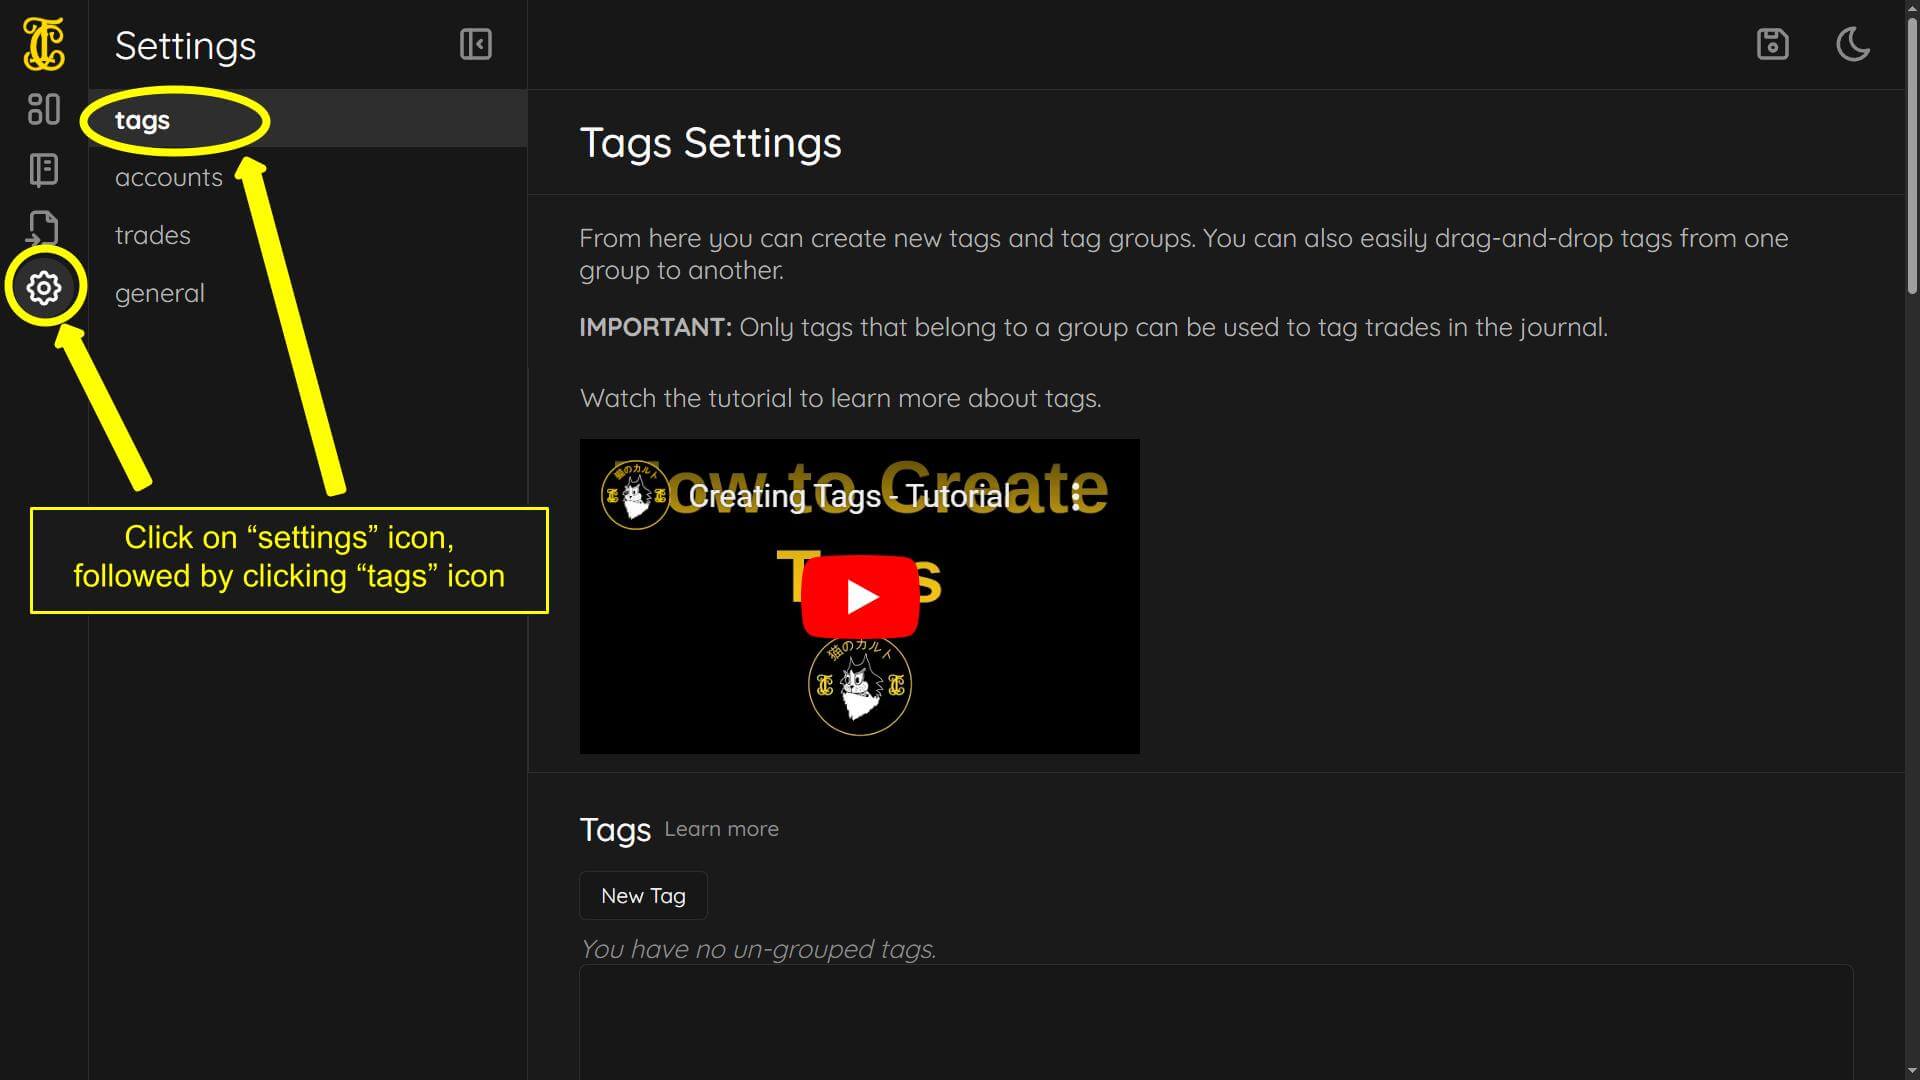
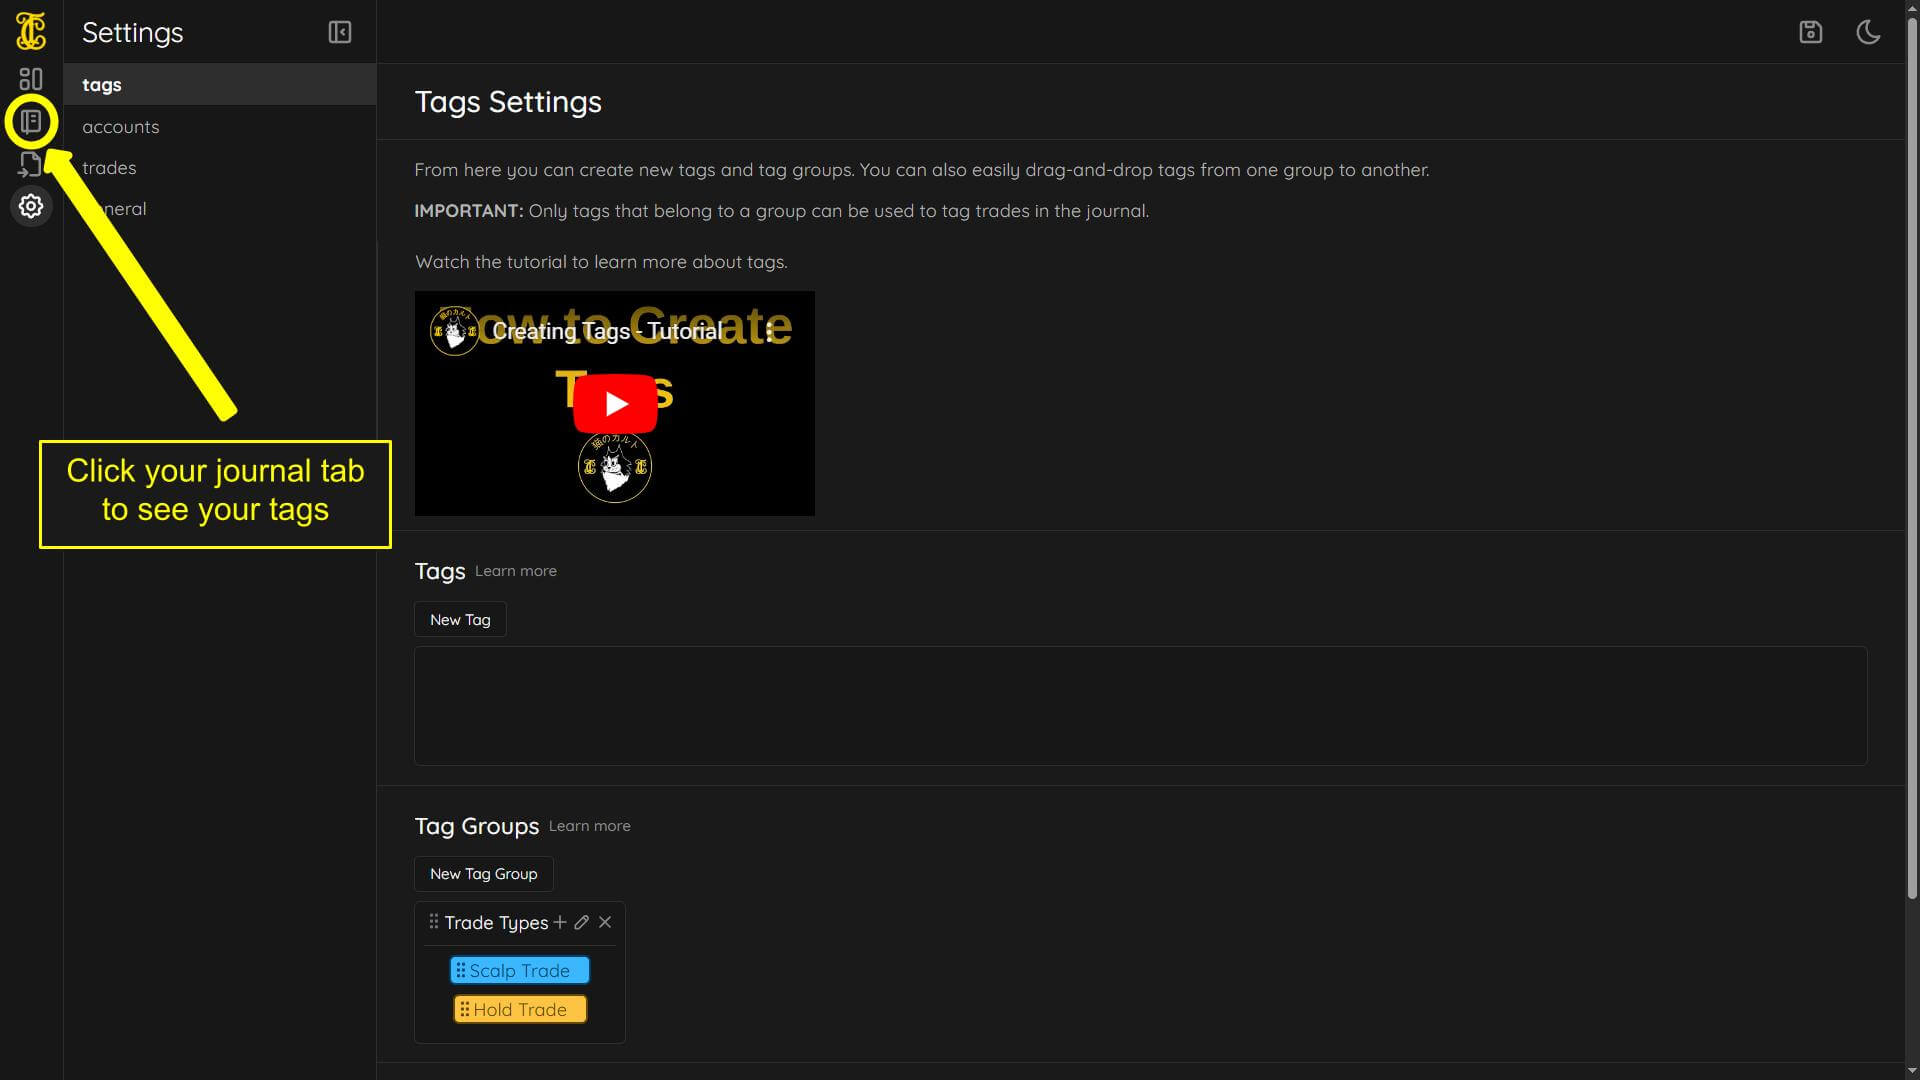
- First click “settings” icon
- Next click “tags” icon
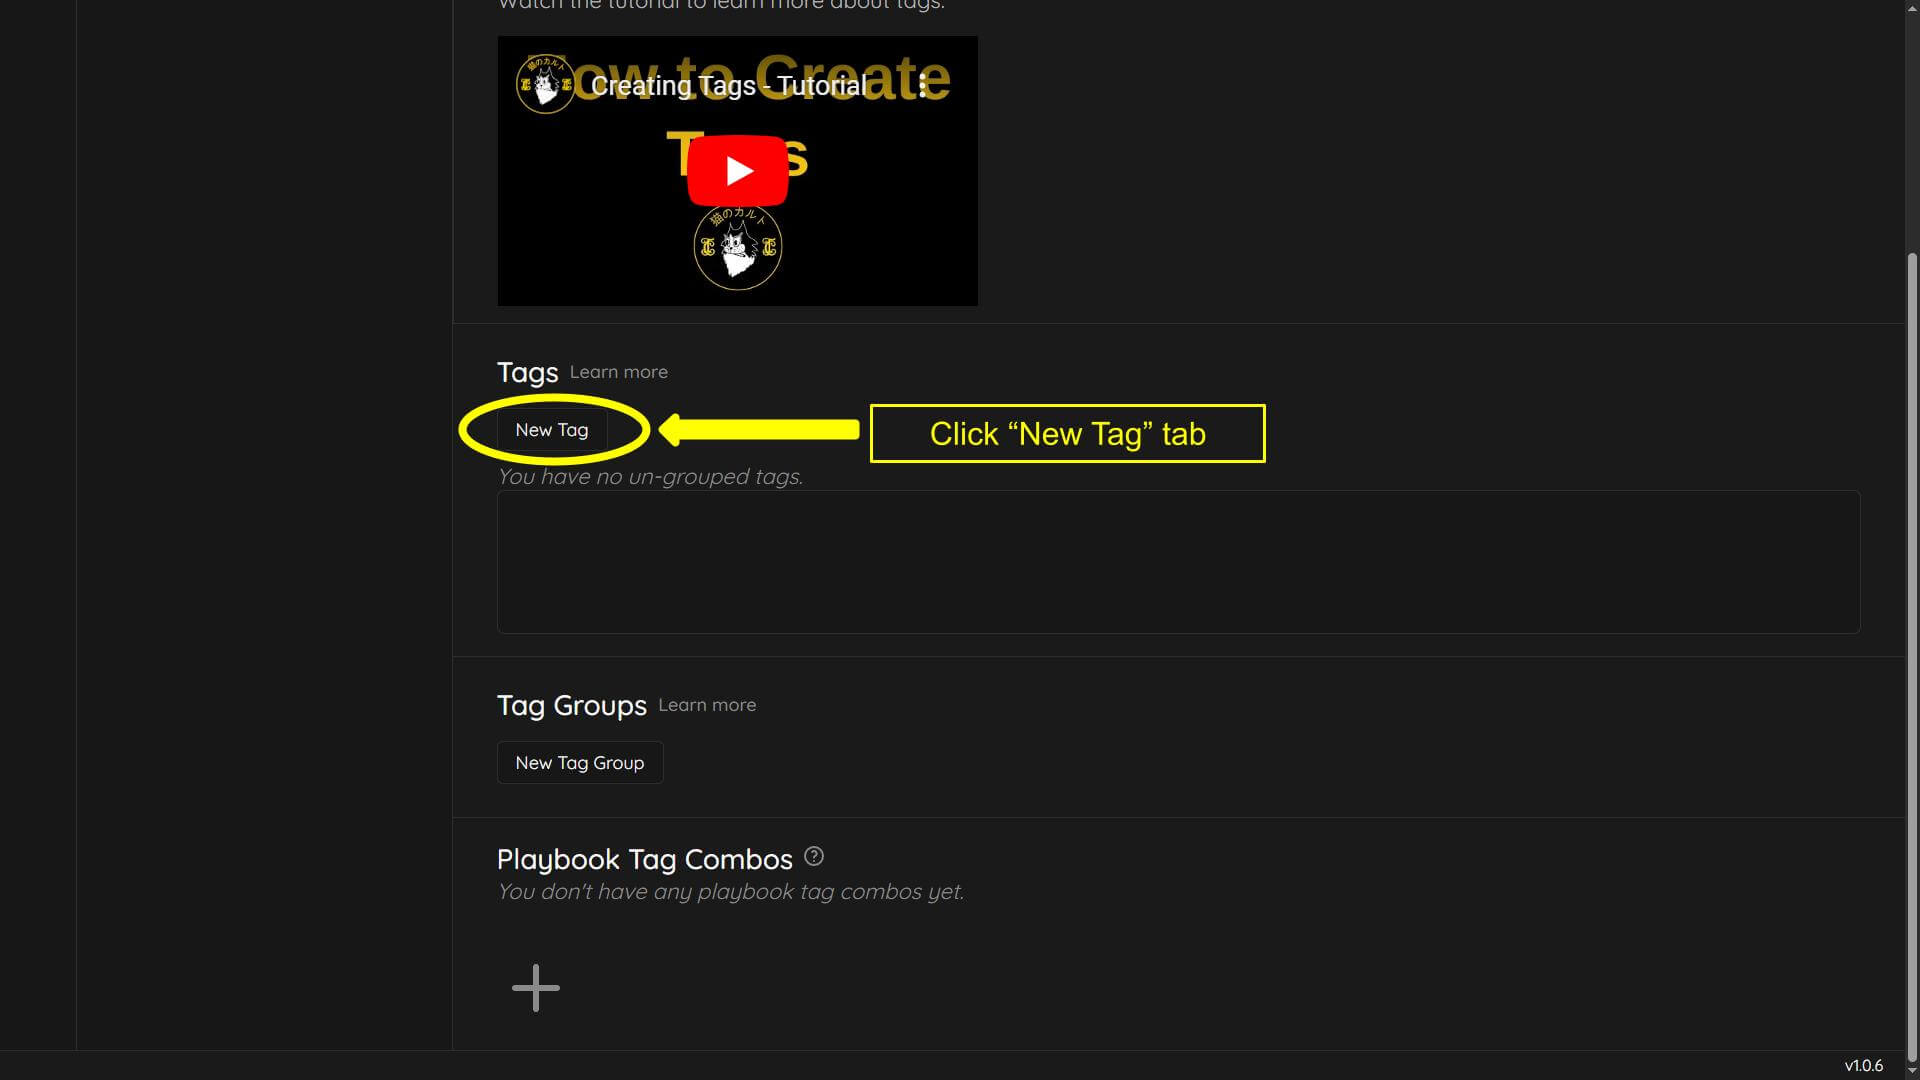
There are two methods of creating a new tag. First we will look at method one.
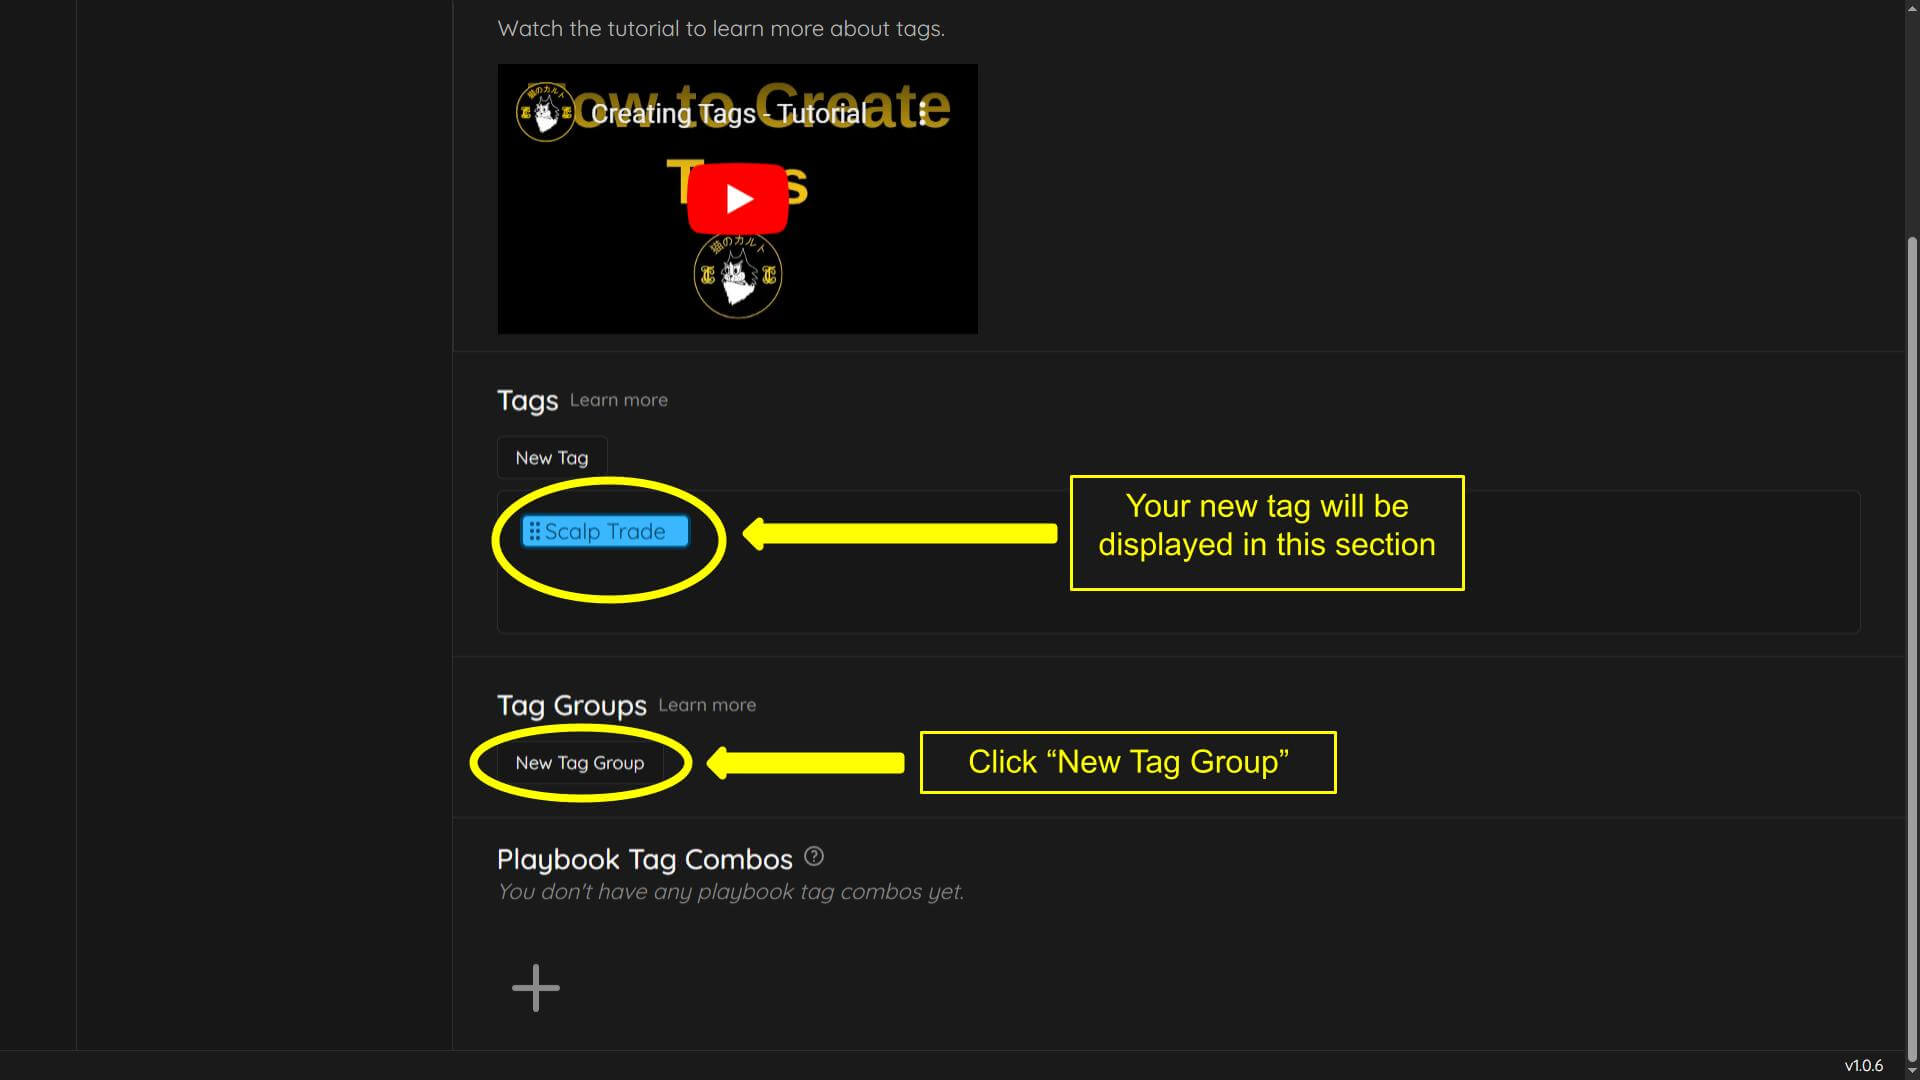
Click “New Tag” button
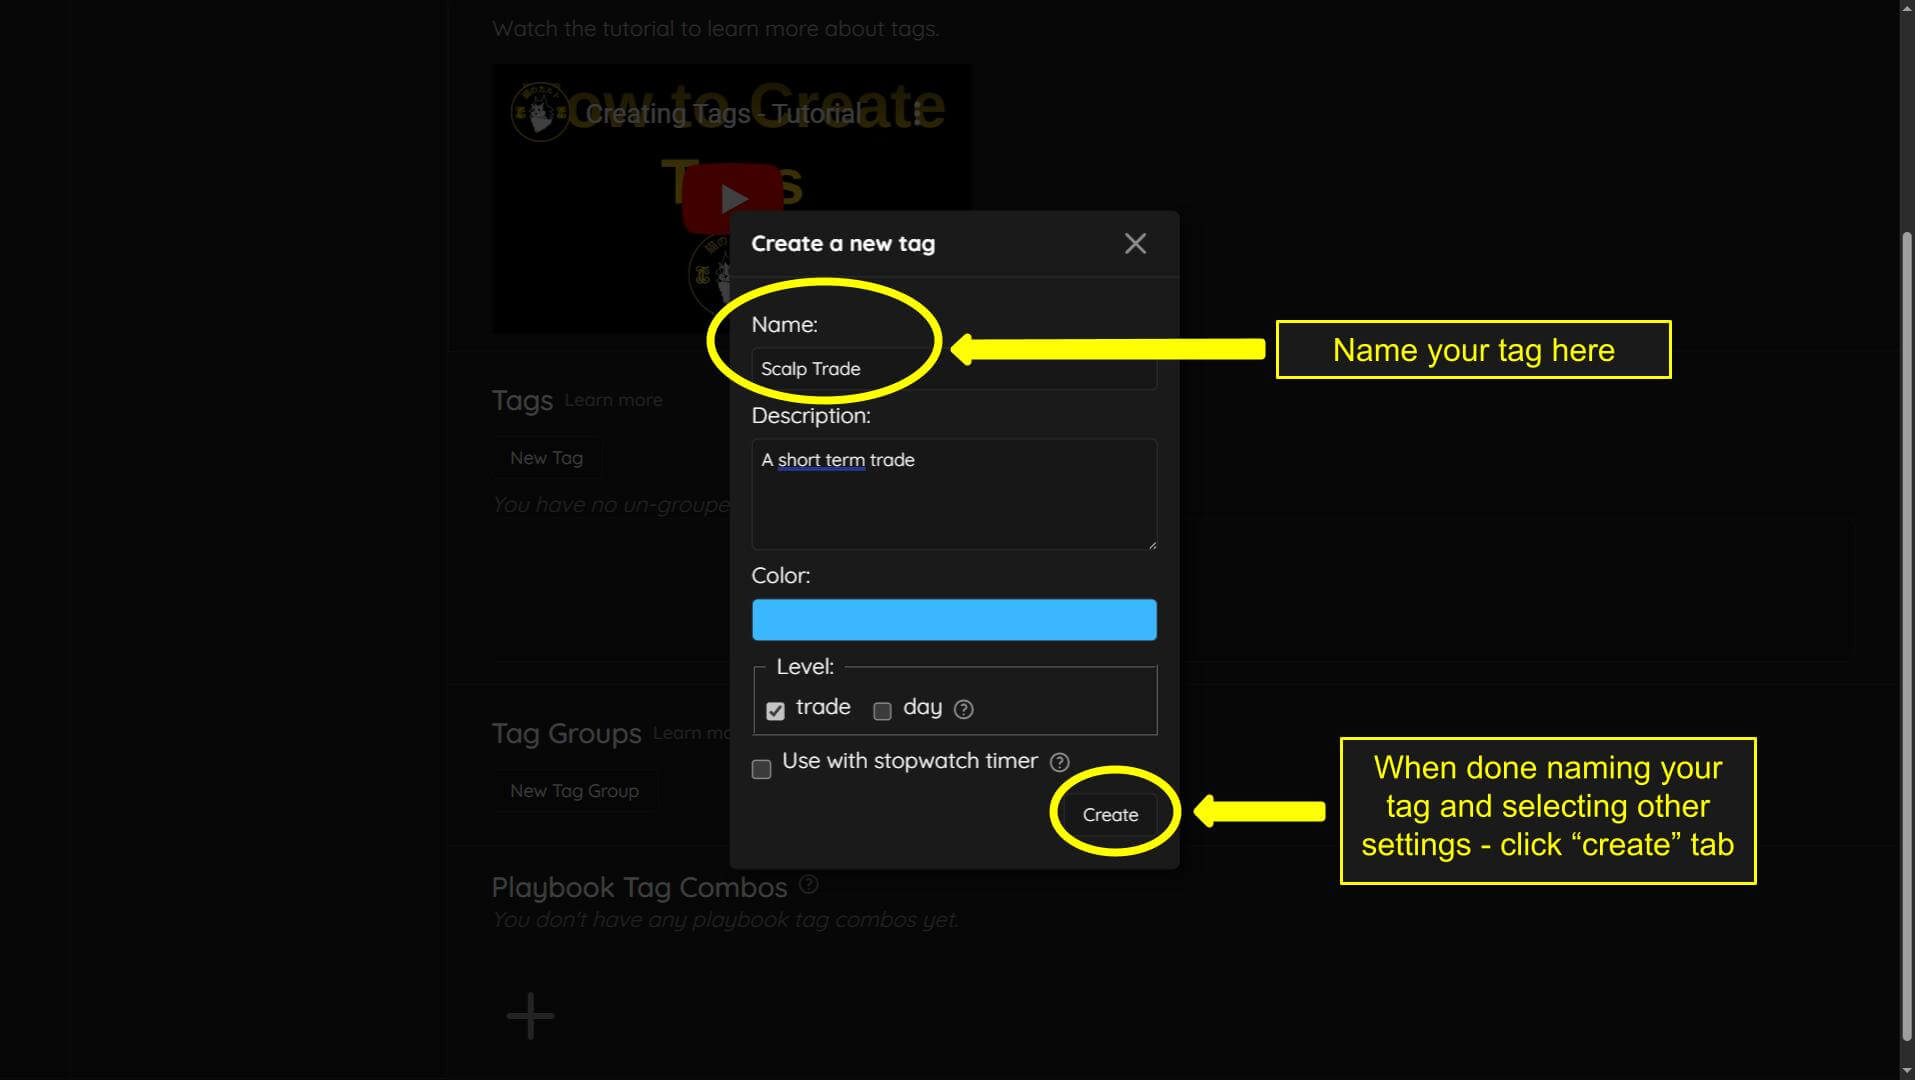
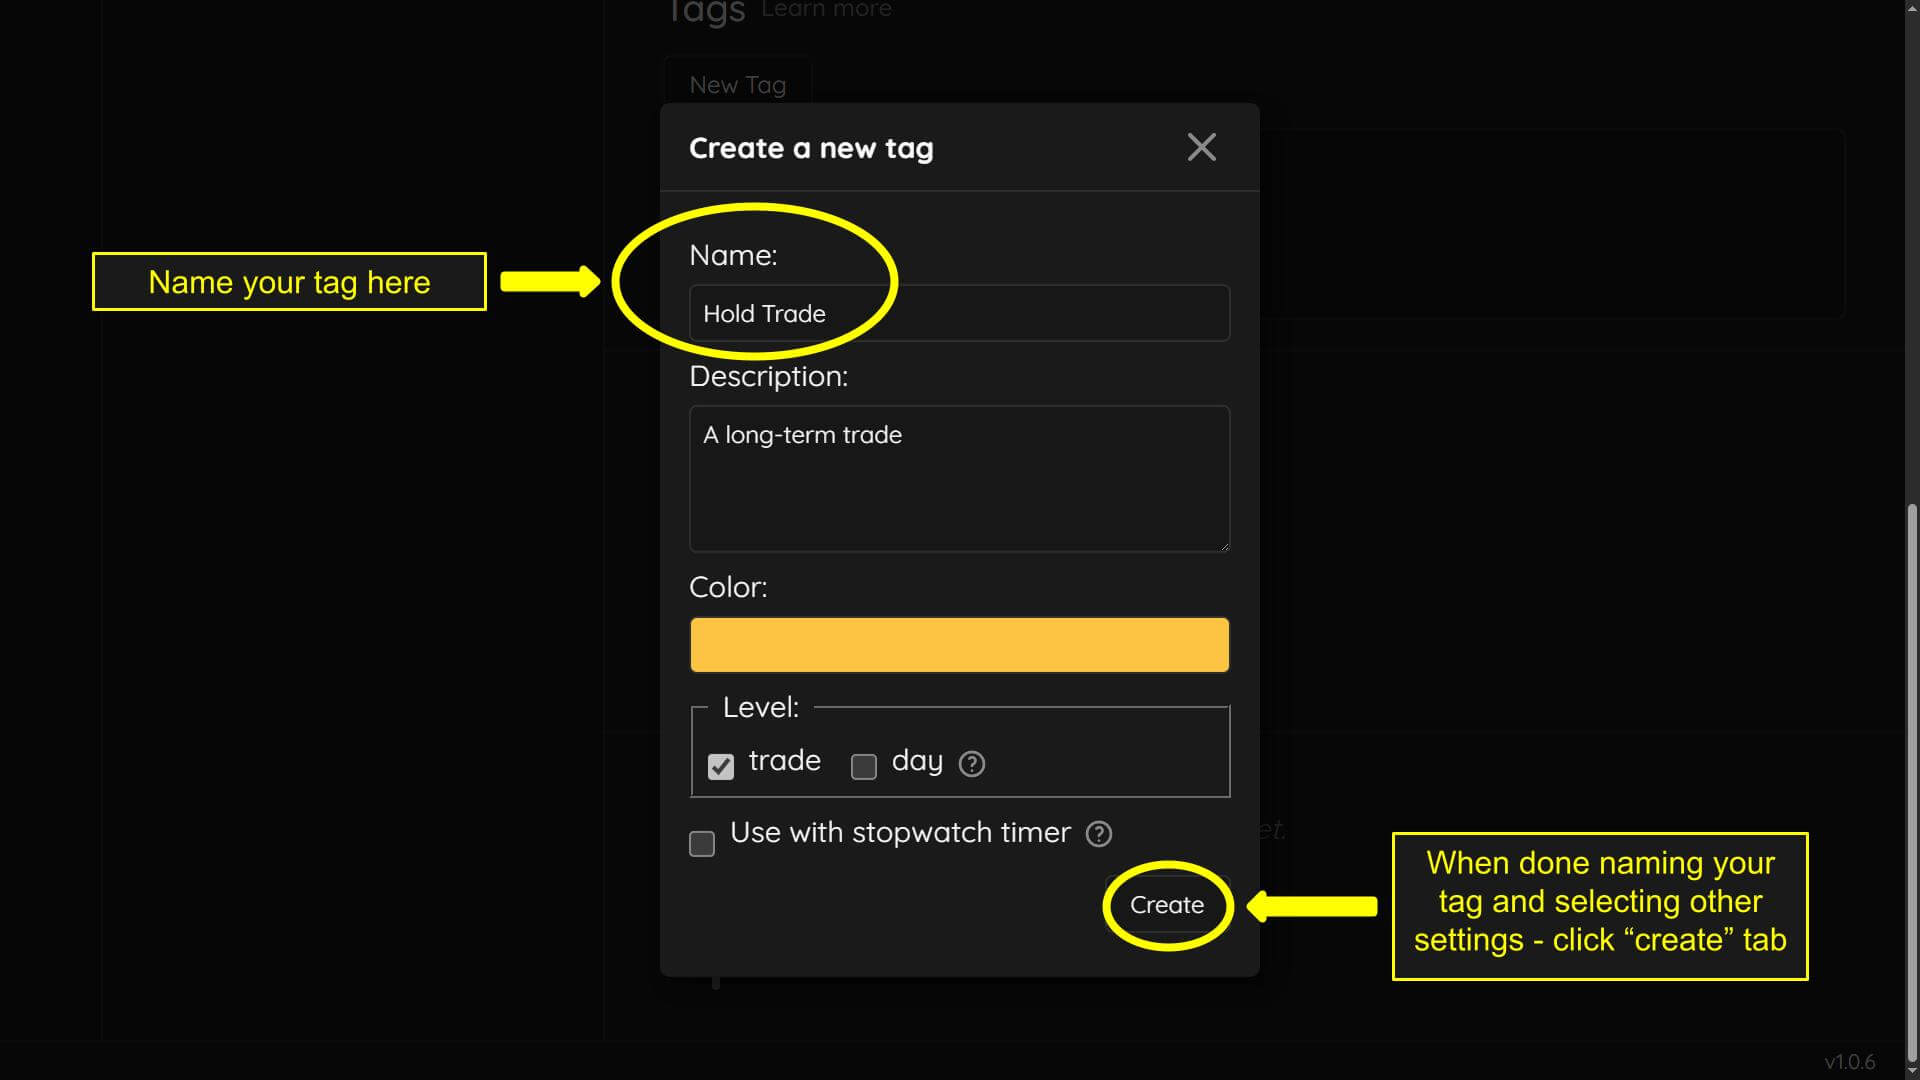
A menu will be brought up where you can name the tag (two tags can not have identical names, each tag must have a unique name) You can add an optional description of the tag. Change the color as well as the settings of how the tag will be displayed in your journal. The settings will be explained further in this tutorial.
Click “Create” tab when finished
The tag will not be displayed on your journal until a group is created.
To create a new group - click “New Tag Group” button
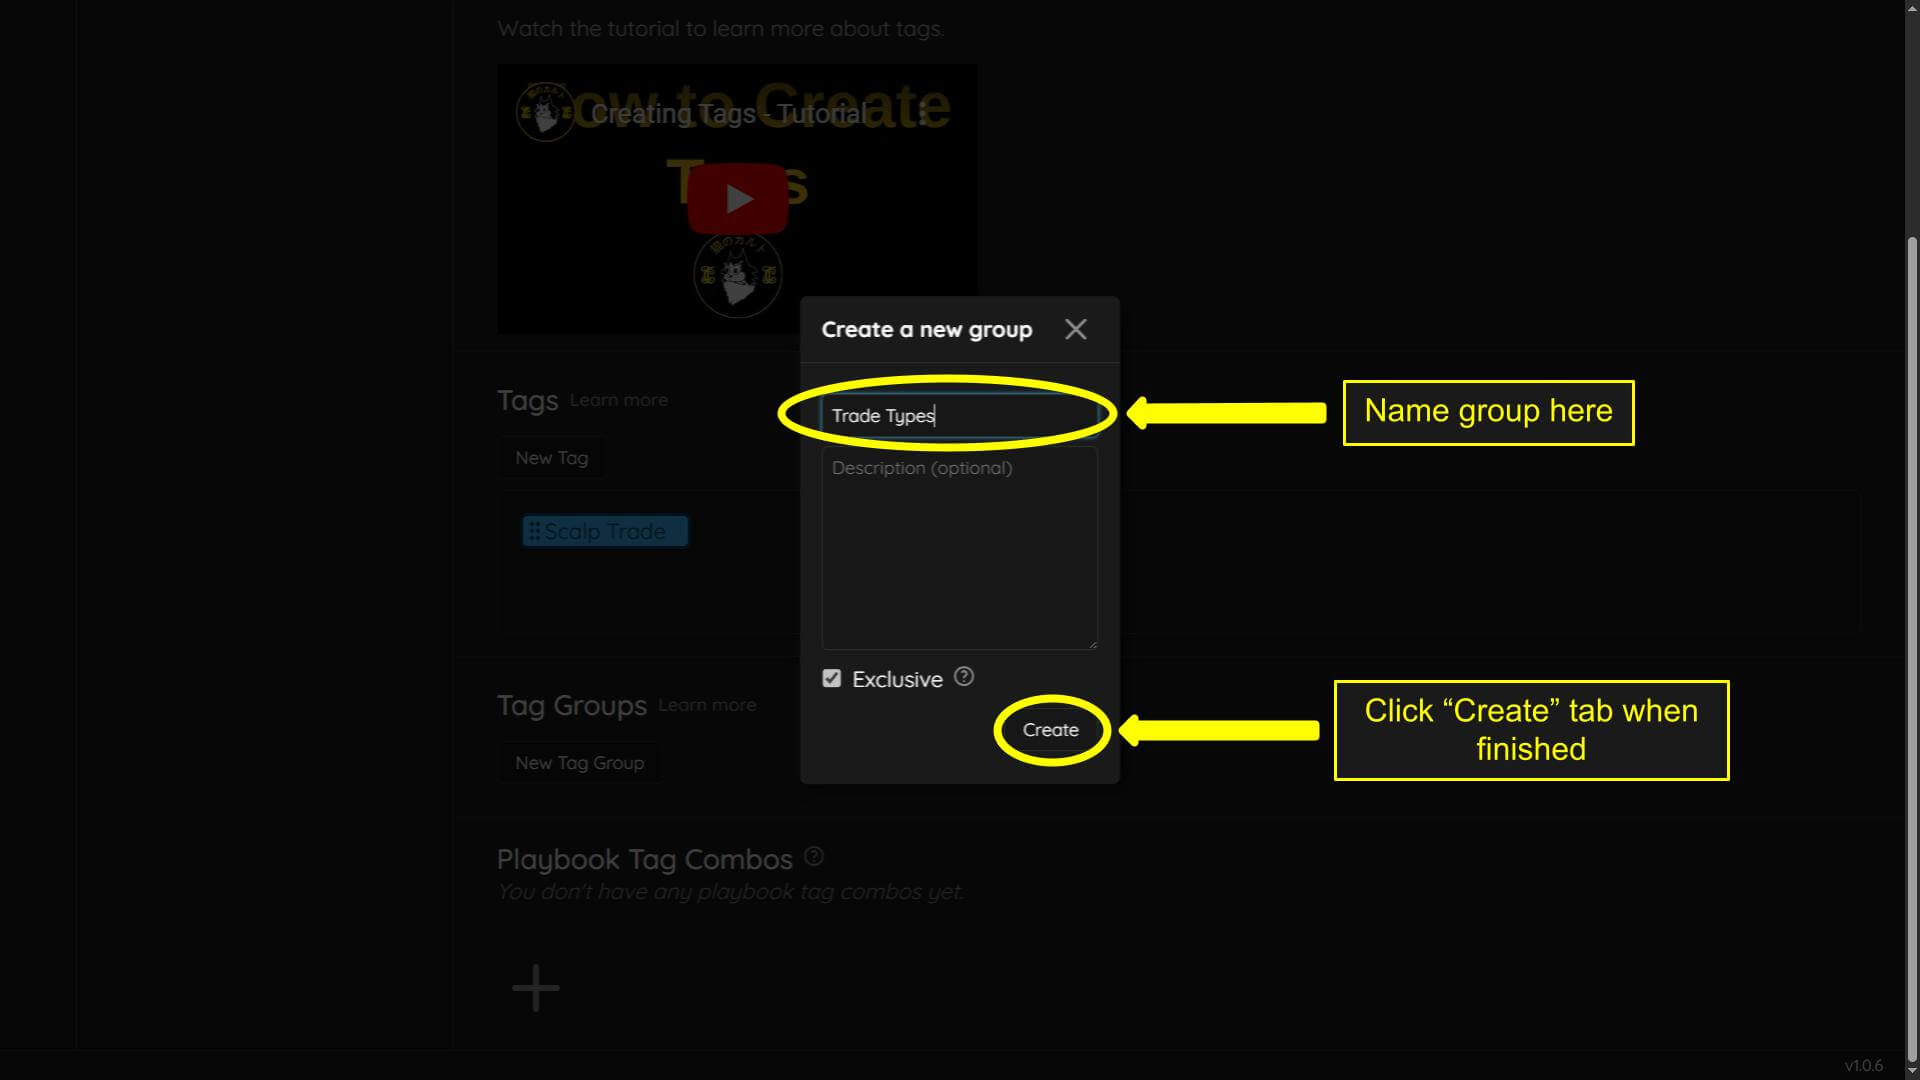
Name your group (there is an “Exclusive” option this will be discussed later in the tutorial)
Click “Create” button when finished
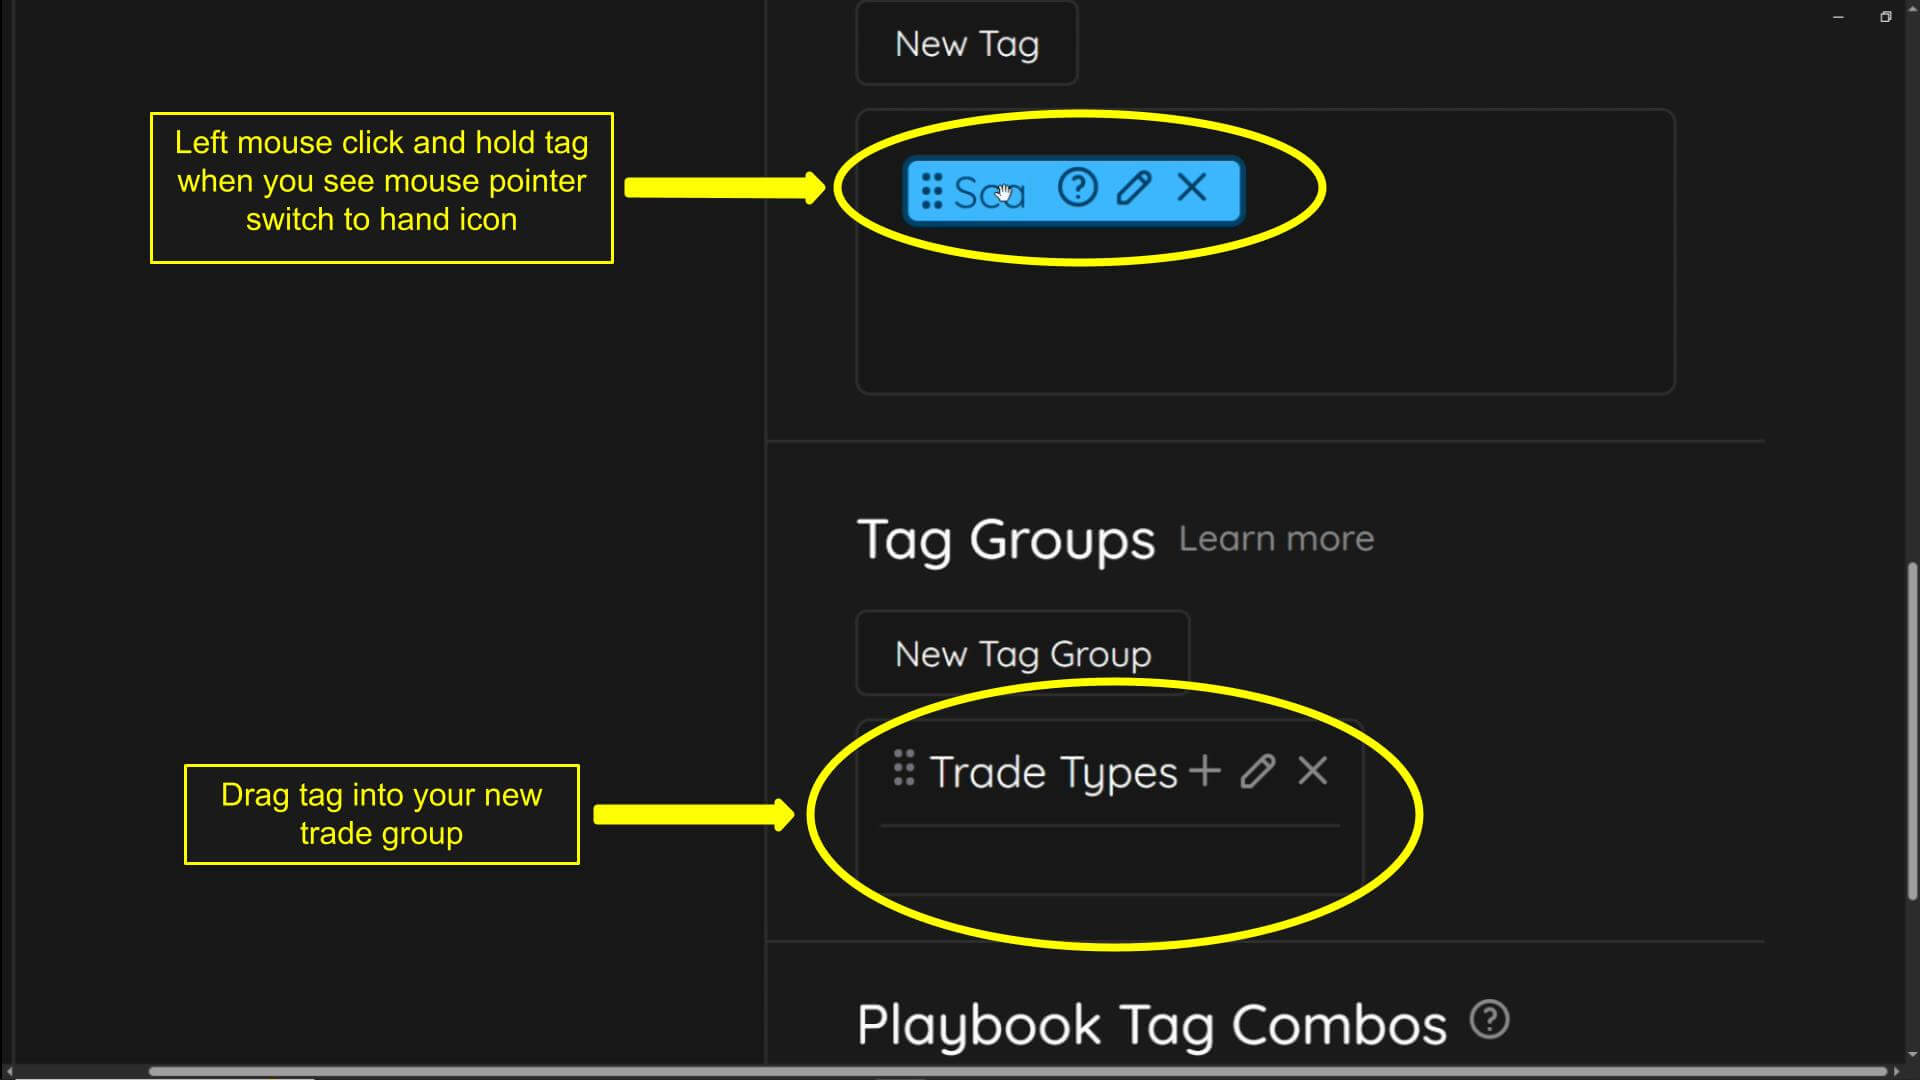
Your groups will be displayed in the “Tag Groups” section. Tag groups will not be displayed in your journal until a tag is added. In order to add a tag into the group there are two methods. We will show you the first method here.
Hover over tag until you see your cursor change into a hand.
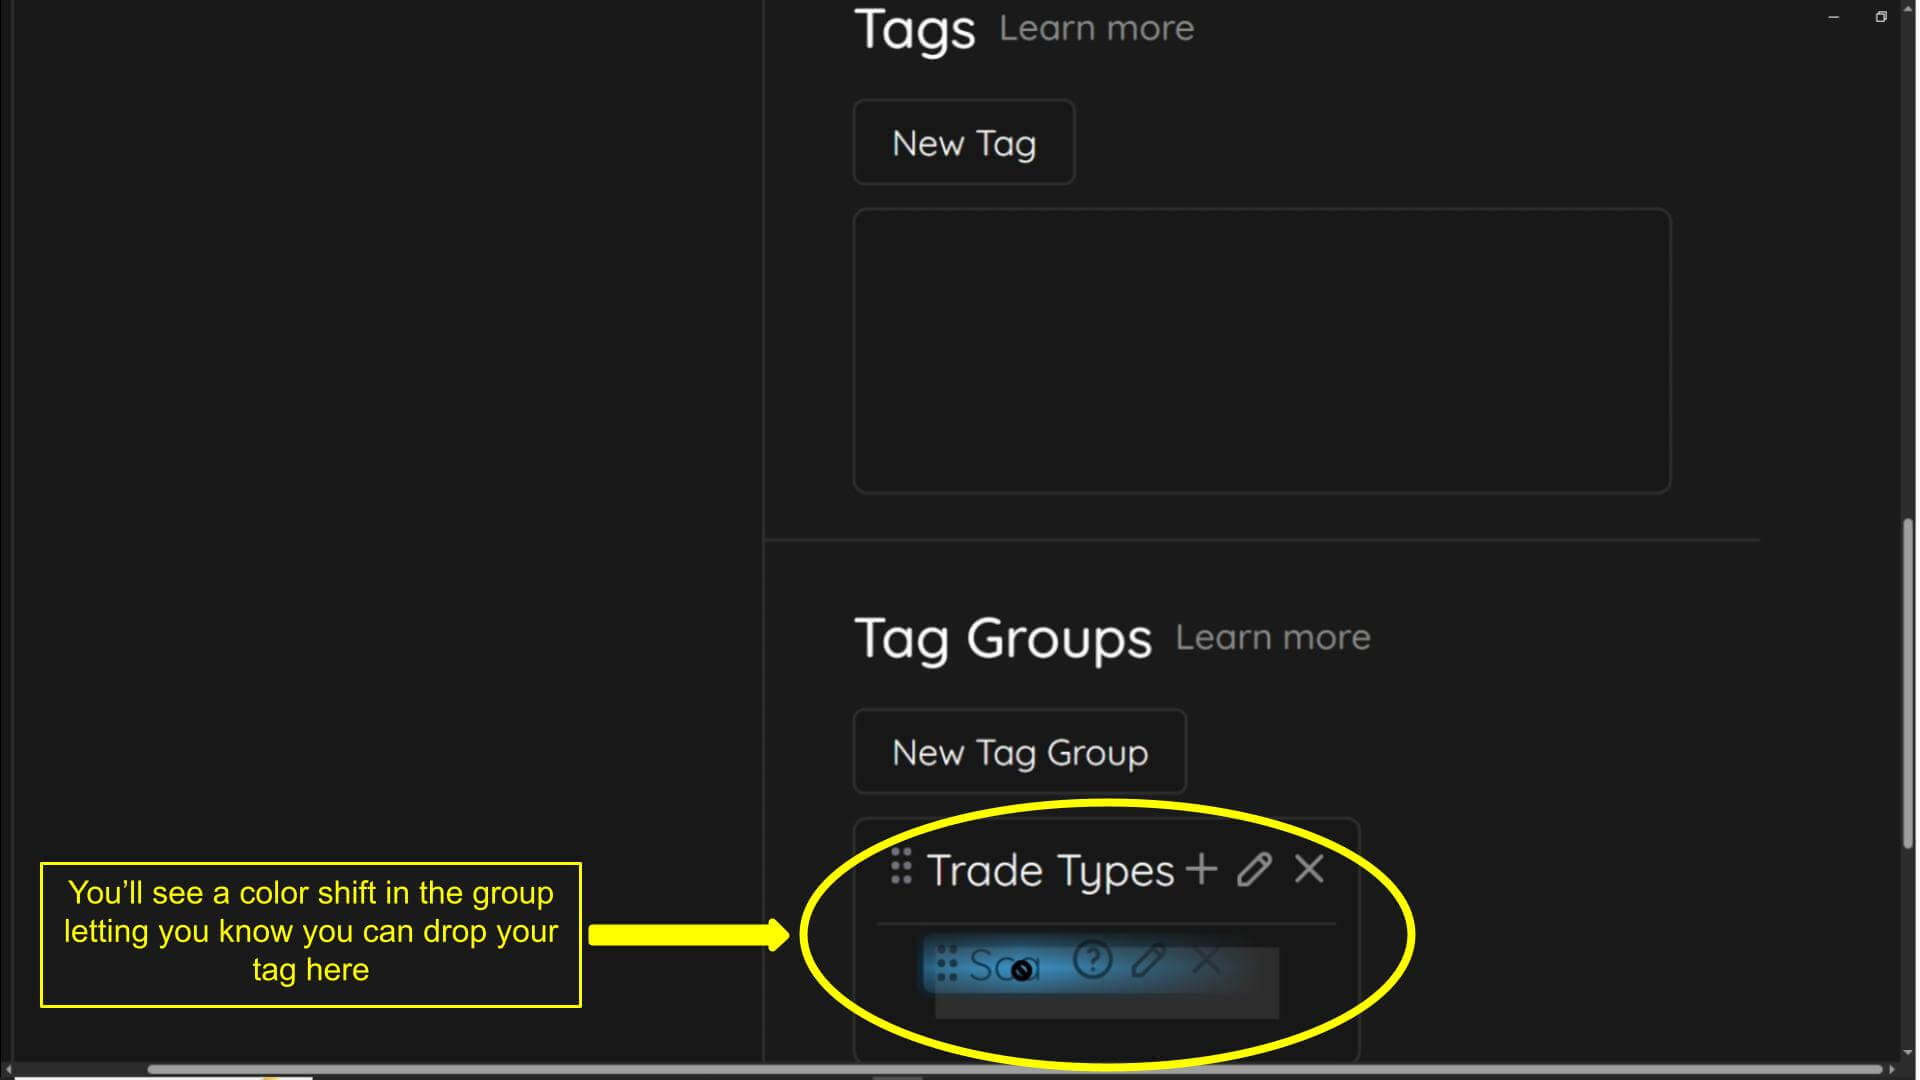
Hold left click and physically drag the tag into your new trade group you created. You will see a slight color shift in the group showing you where to drop your tag.
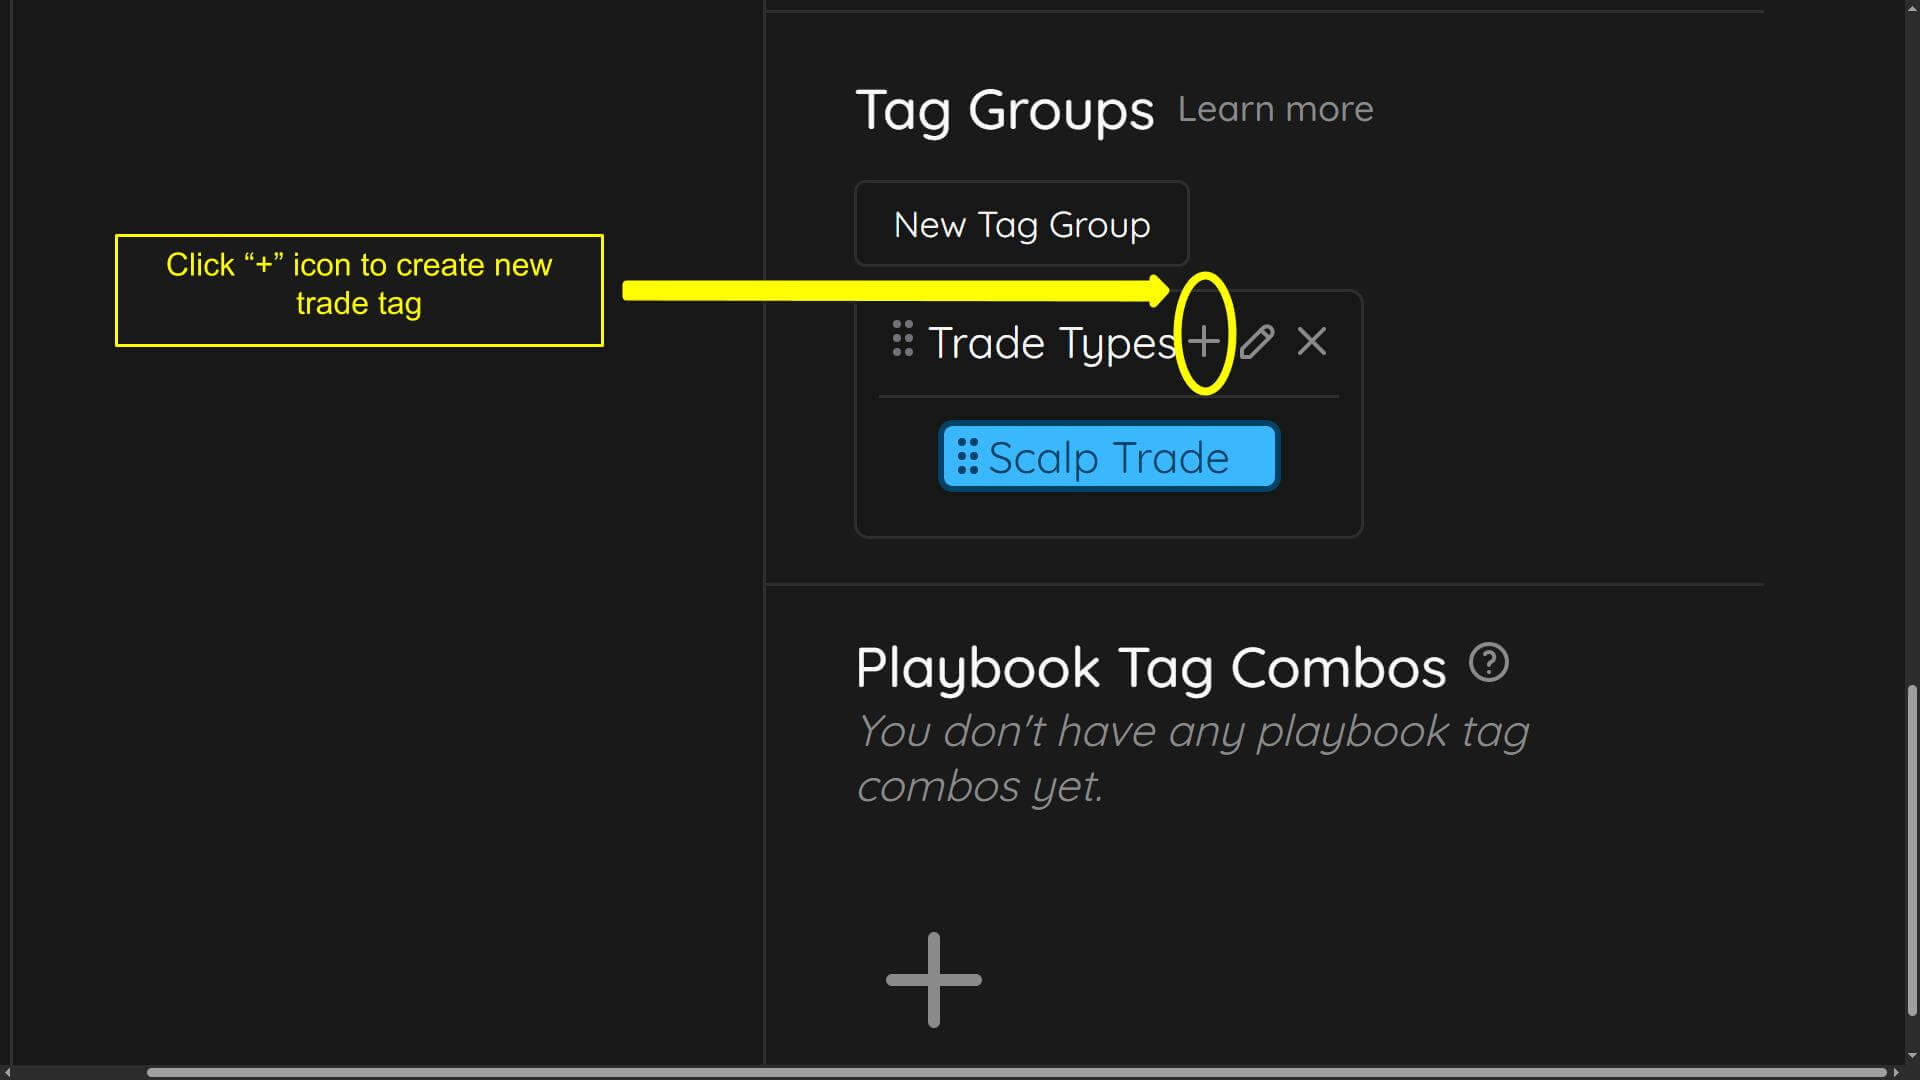
We will now show an alternate way to creating a new trade tag. Once you create a group you can create a new trade tag directly from the trade group.
Click the “+” icon to create new tag. This is the same menu as shown earlier in this tutorial.
Click “Create” tab when finished
Exclusive tag setting tutorial
Now we will show you what the “Exclusive” setting is. The “Exclusive” setting in the tag group allows you to select only one trade tag at a time in its assigned group. To preview this you can go to your journal by:
-Selecting the journal tab
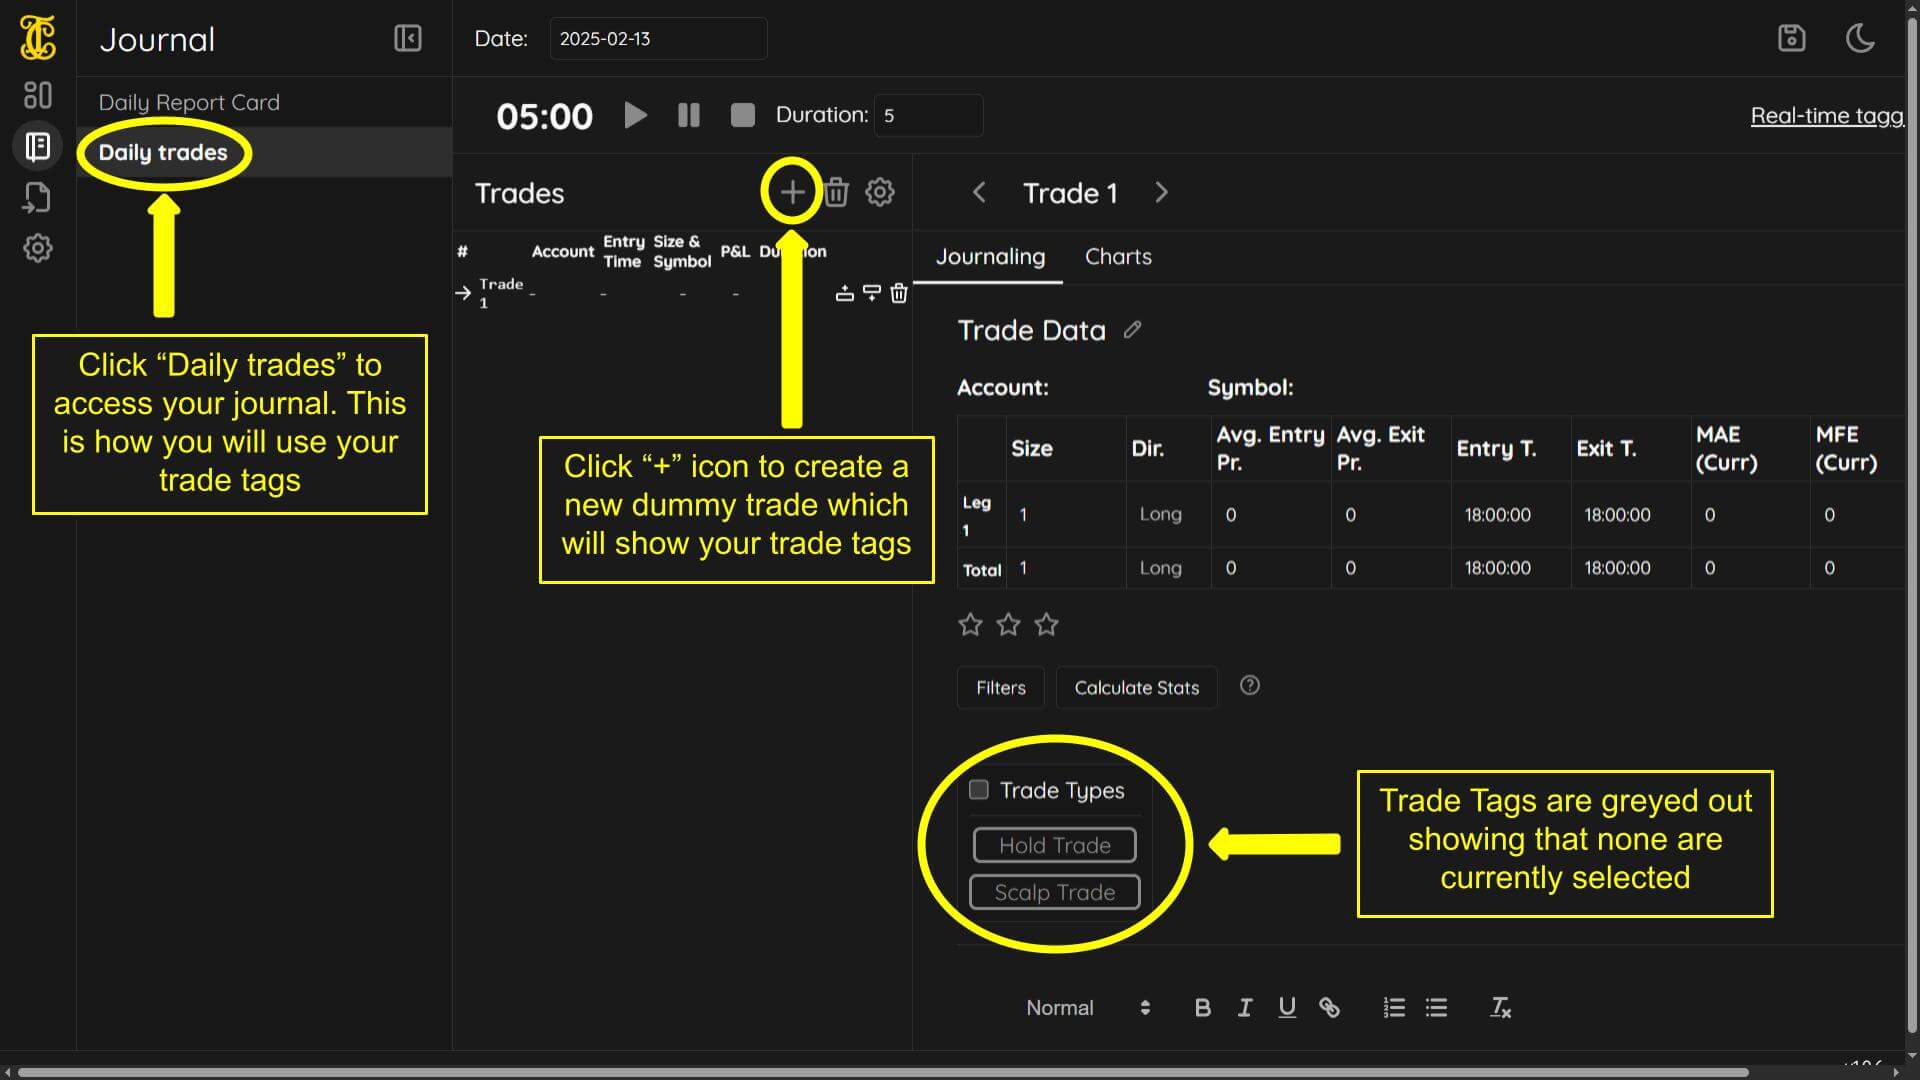
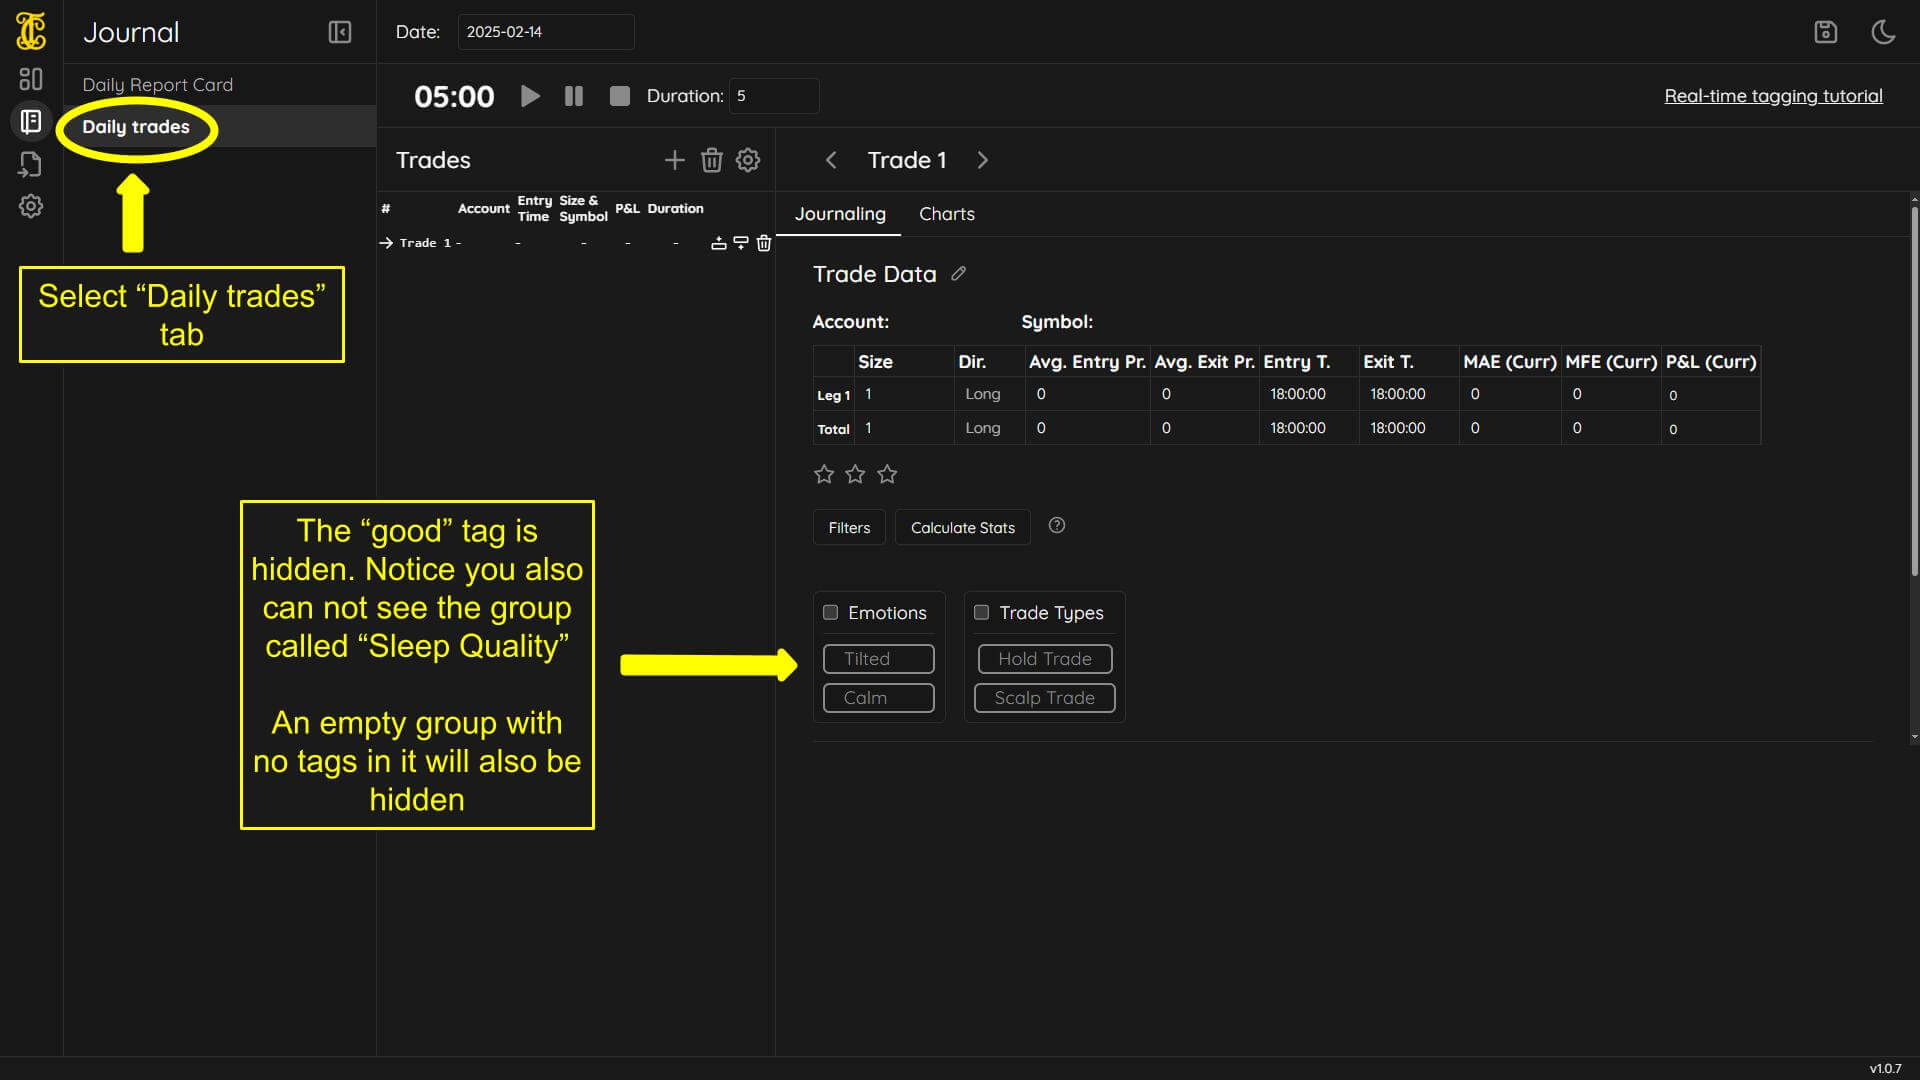
-Selecting the “Daily trades” tab
-Finally add a dummy trade by clicking the the “+” icon
You will then see your trade tags greyed out - meaning they don’t have the colors you assigned to them. This means no tags are selected.
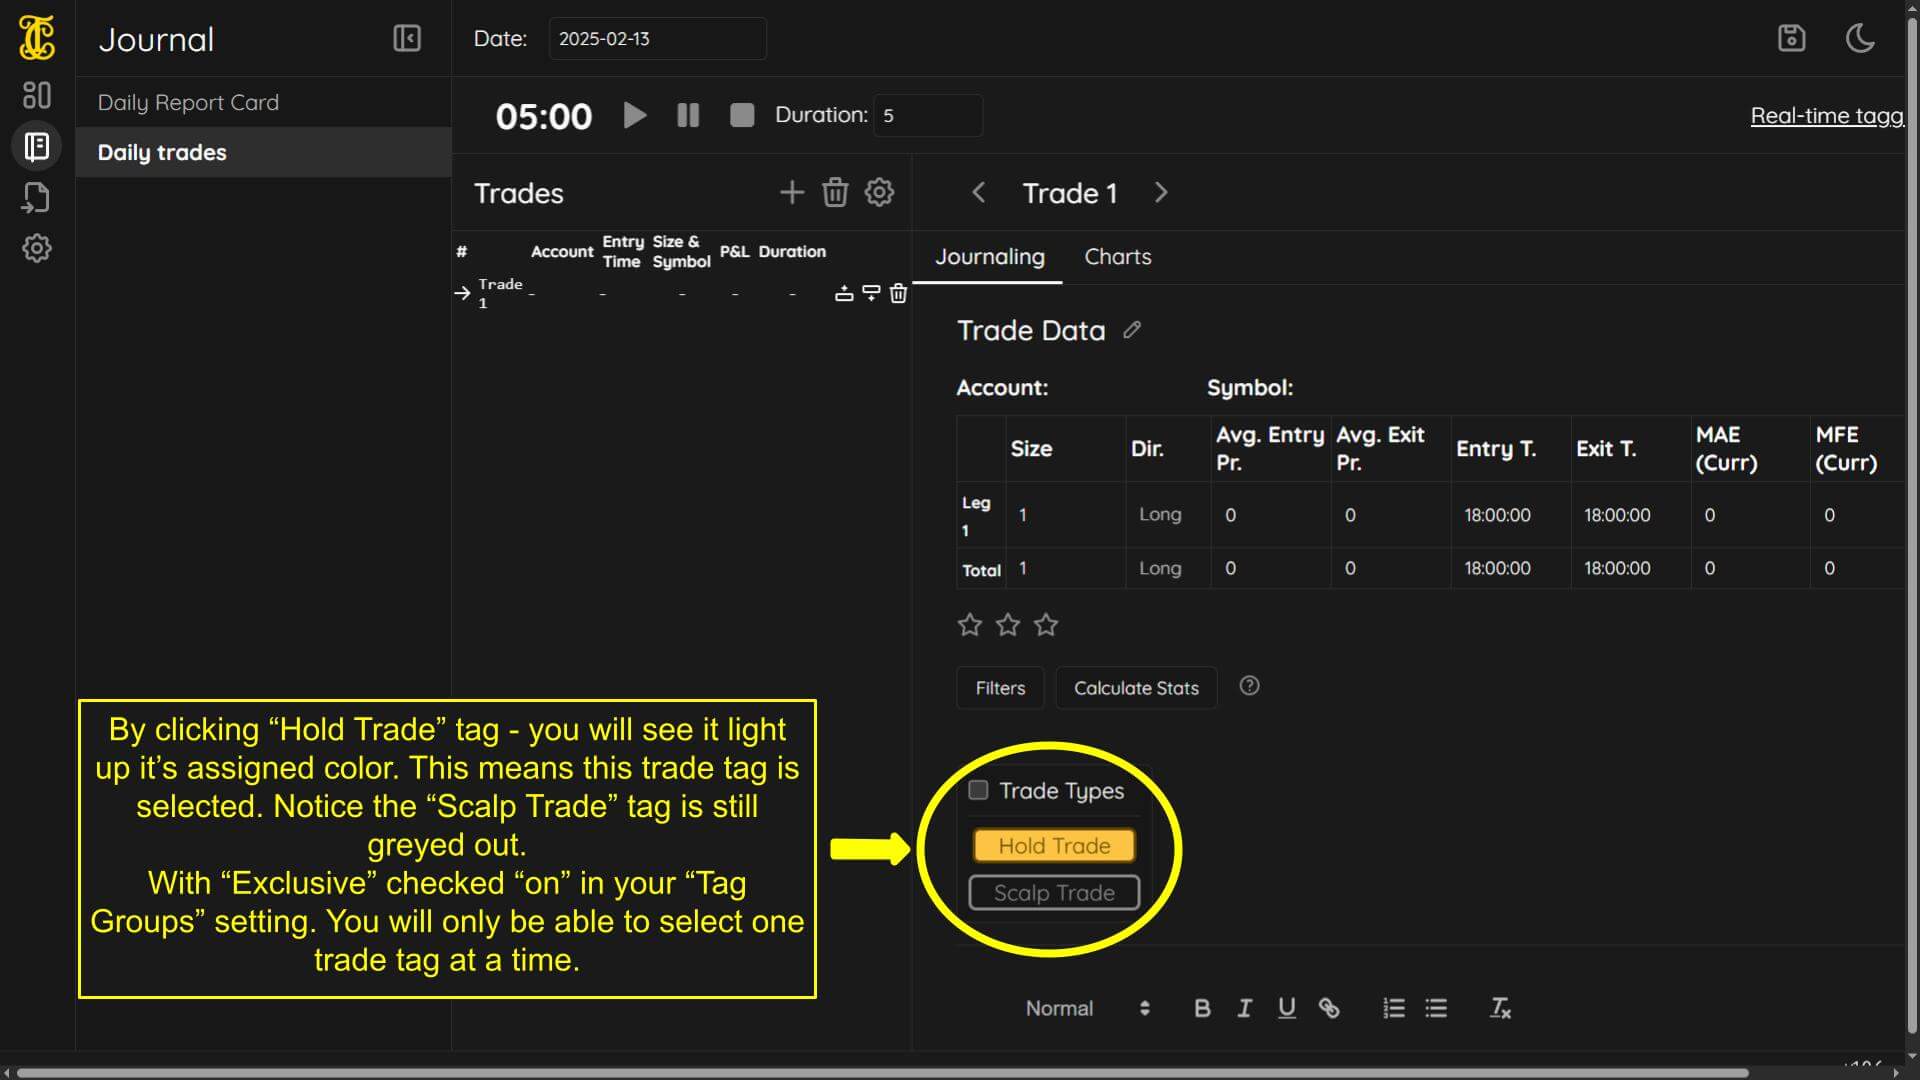
-Click on a tag and it will light up assigned color
-Click on the other greyed out tag and the originally selected tag will deselect greying out. The new tag will now light up your assigned color showing that this tag is now selected
Now we will show you what unchecking the “Exclusive” setting will do. First you need to go to your “settings” section and then “tags”. Next you will:
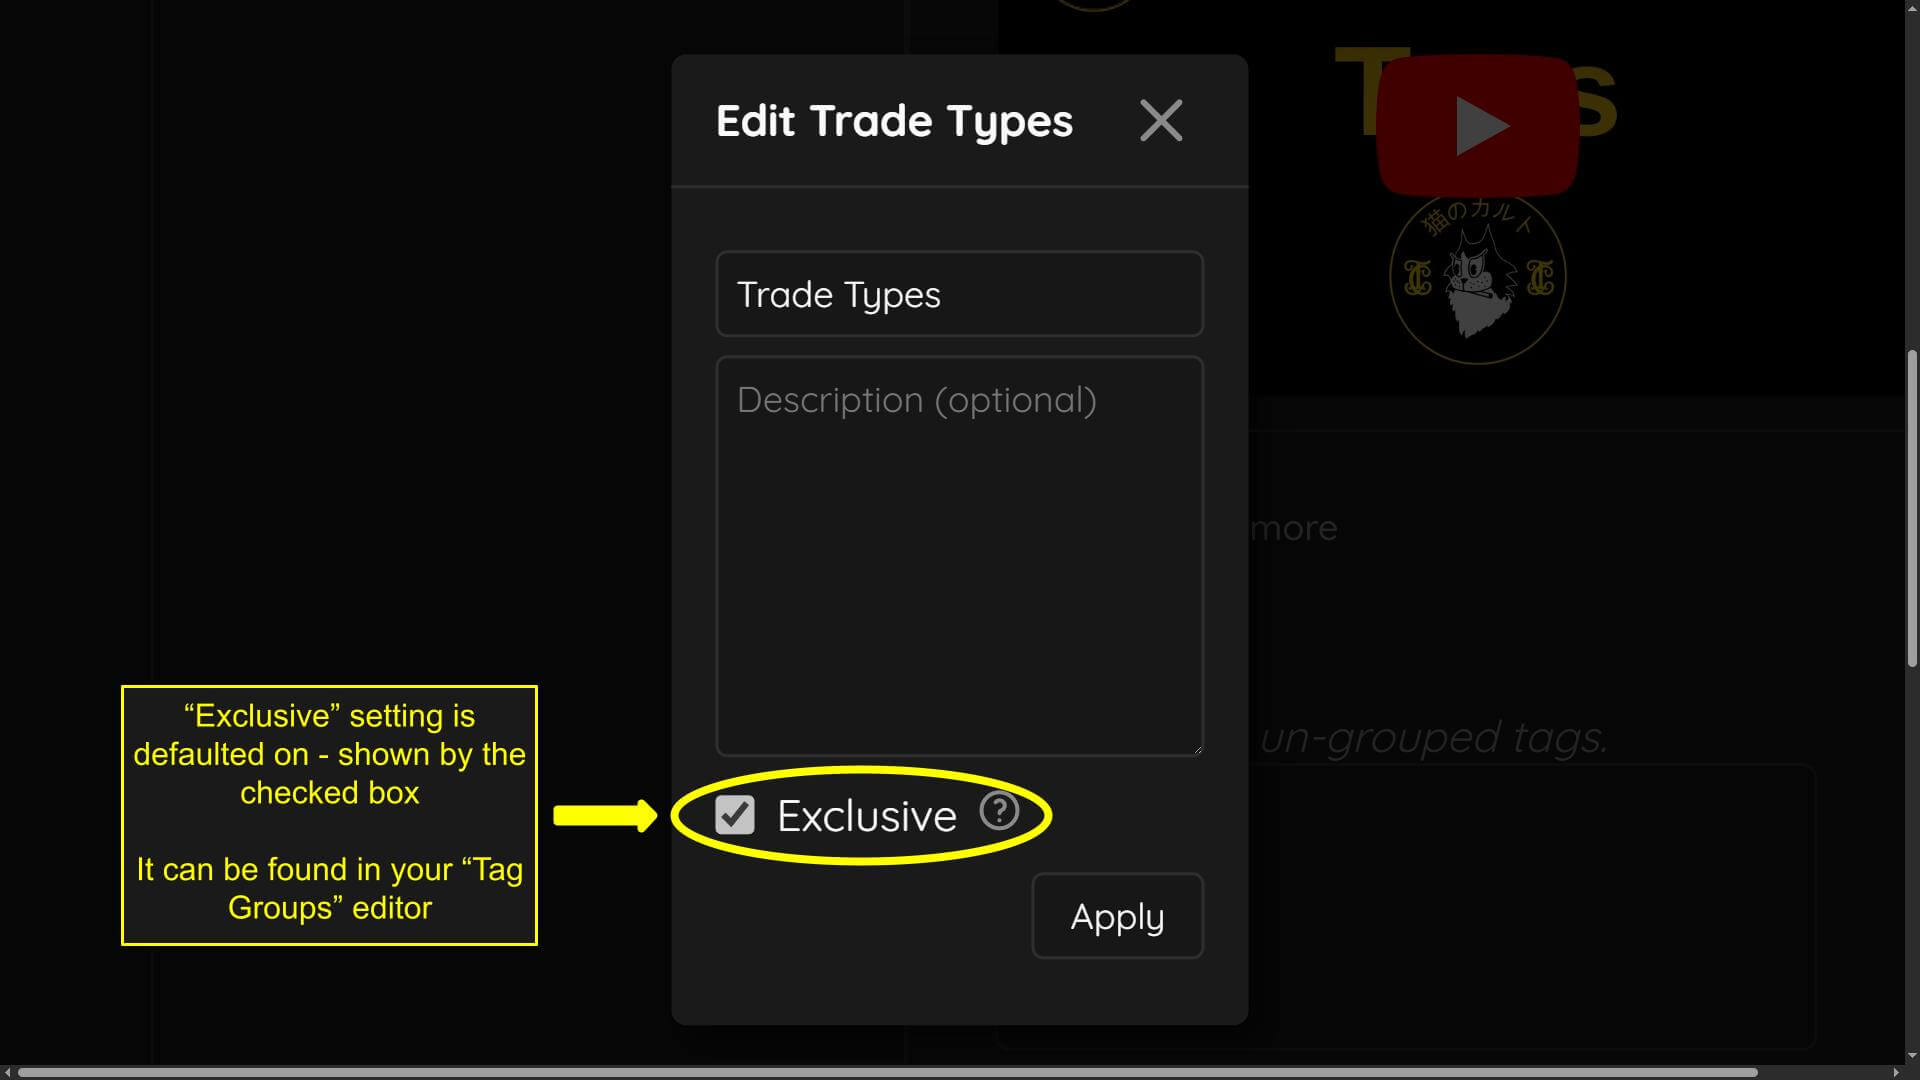
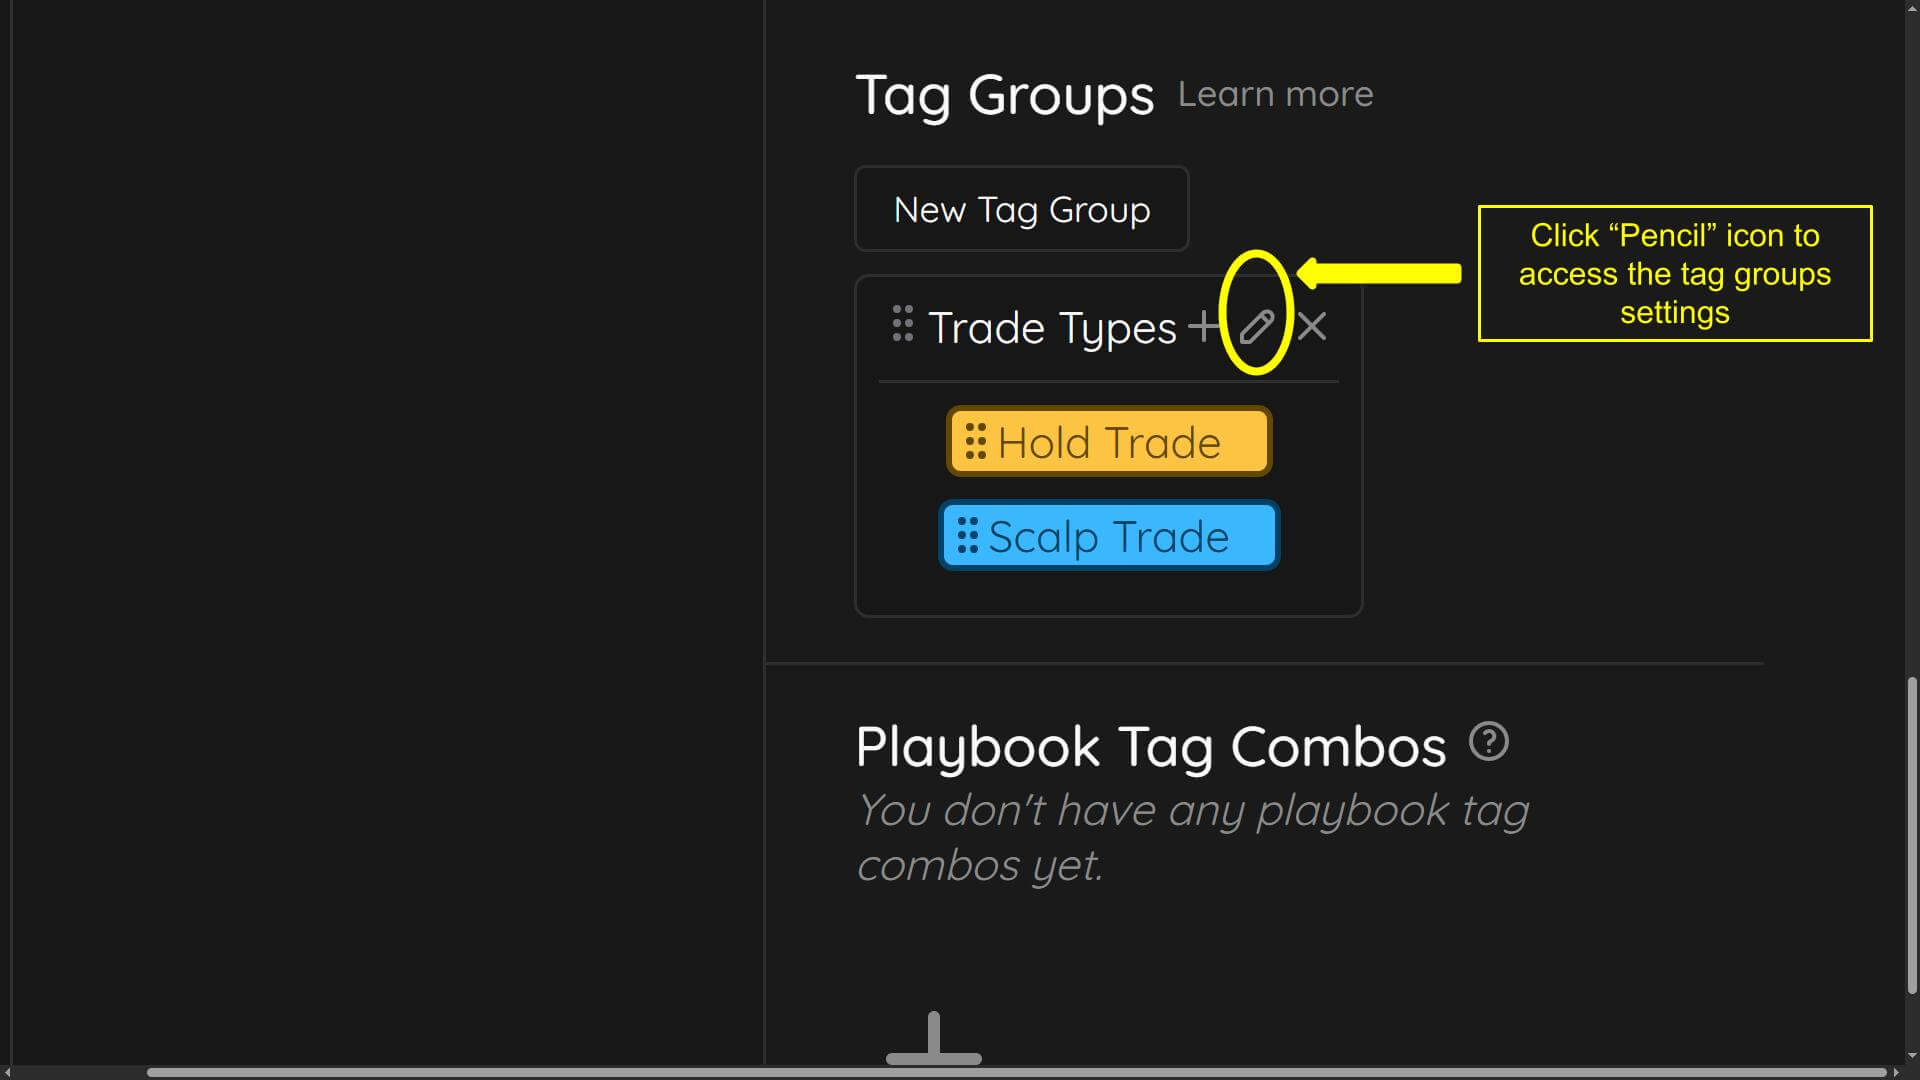
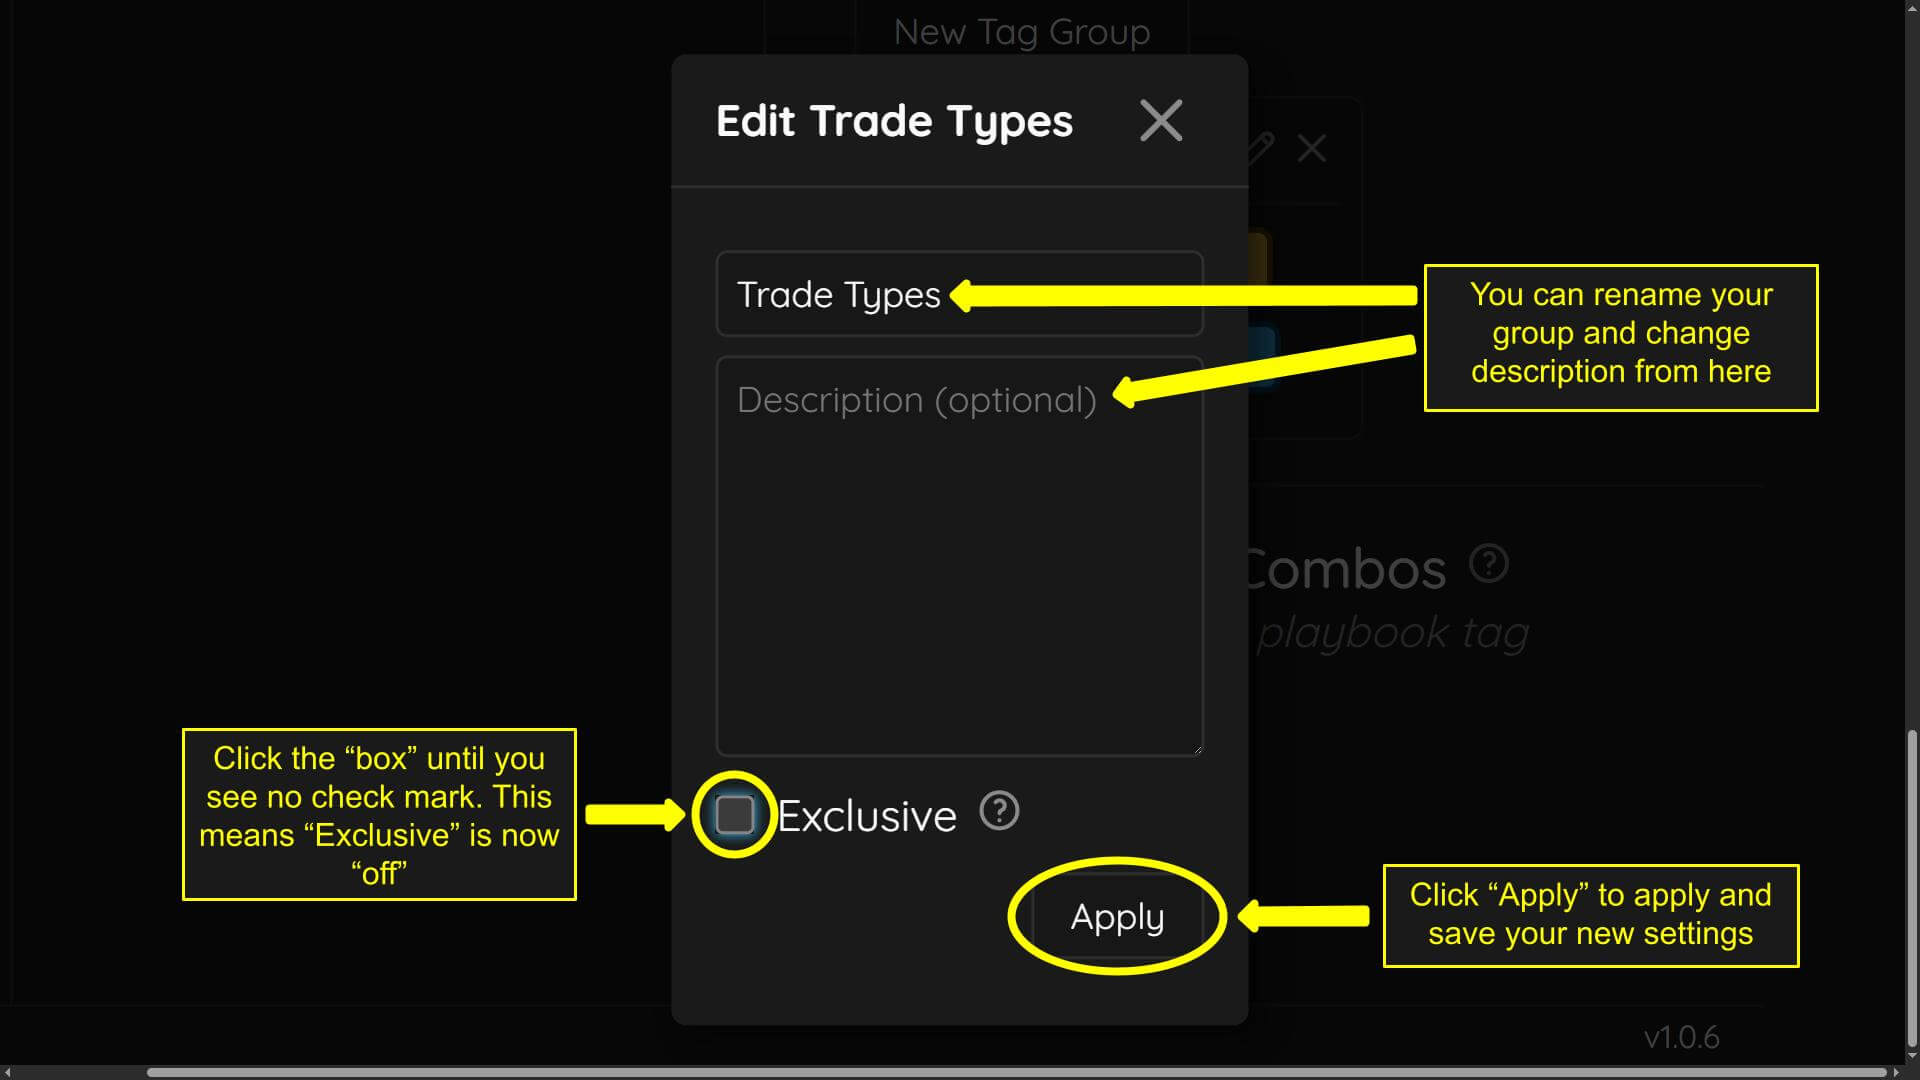
-Click the “Pencil” icon on your trade group to access the “Exclusive” setting (You can also edit the groups name and description from here)
-Click the “Exclusive” box until it has no check mark in it - this means “Exclusive” is now off
-Click “Apply” to apply and save the new settings
With the “Exclusive” box turned off. You will now be able to selected as many trade tags as you want within this “Tag Group”

Day VS Trade tag setting tutorial
Now we will discuss the settings inside of individual tags and what their functions are. First we will discuss the “day” VS the “trade” setting. The way you access your trade tags setting is by going to the “settings” section, then clicking on “tags”. Next find your individual tags and select one to access it’s settings by:
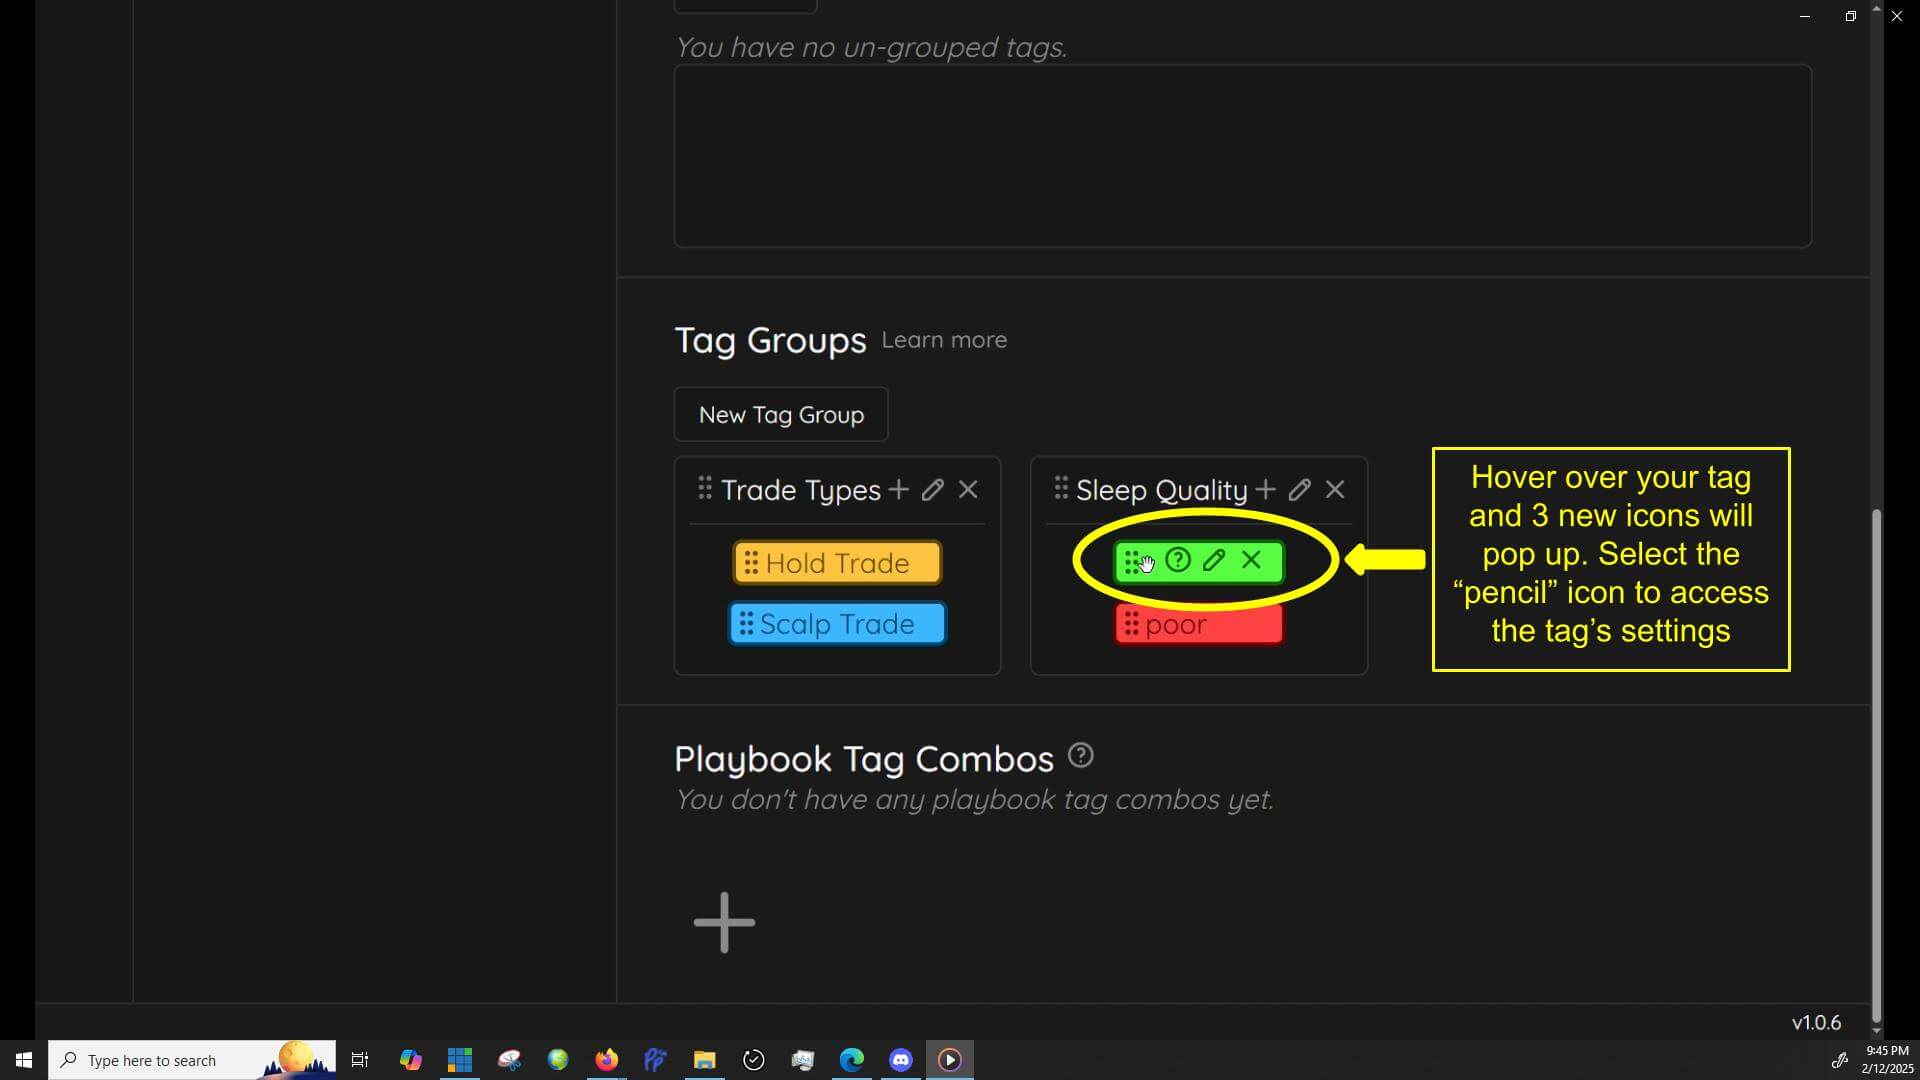
-Hover over the trade tag and 3 icons will show up
-Select the “pencil” icon on the individual tag. This will open it’s settings once clicked
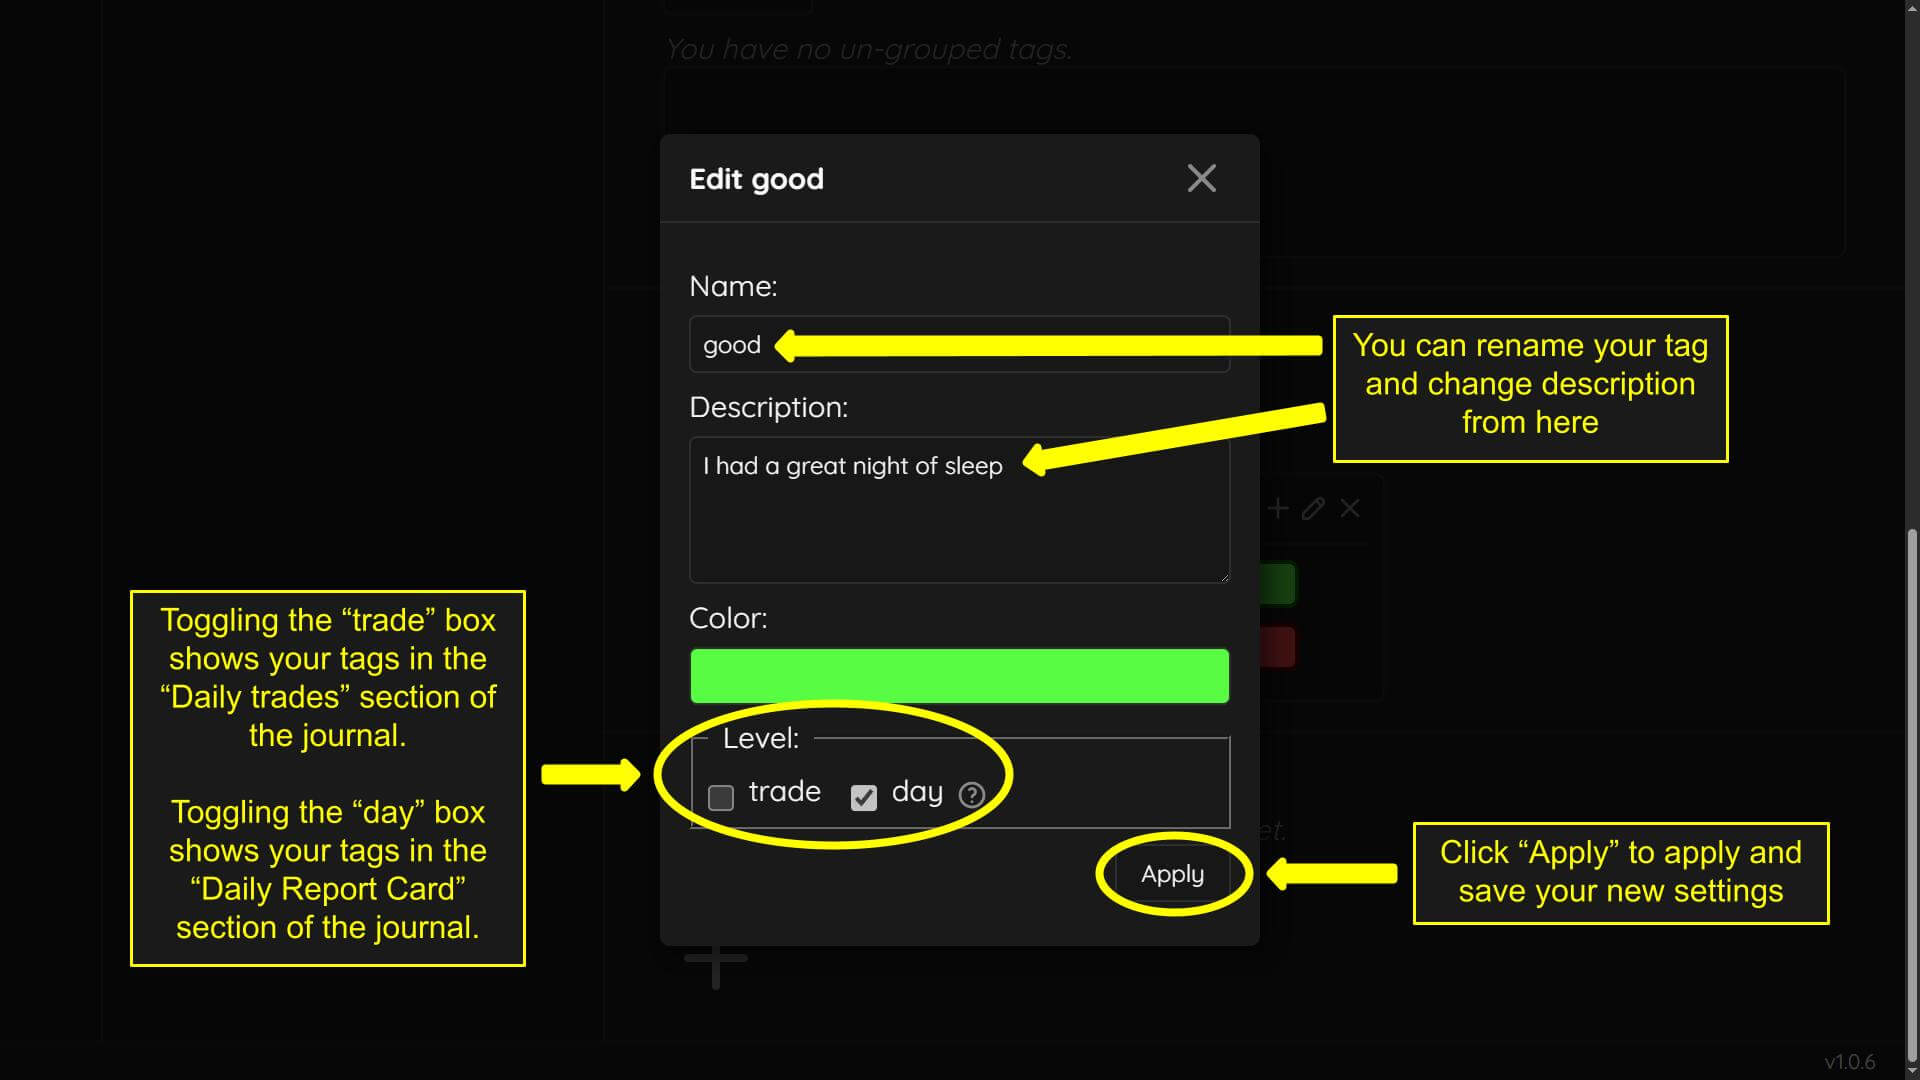
The “trade” level toggled on shows you your tags inside the “Daily Trades” section on your journal. Everytime you take a trade you have to re-tag your trades, as they will always be greyed out once you add another trade.
The “day” tag level toggled on shows your tags in the “Daily Report Card” section of the journal. Every trade you take will inherent your daily tags. For example if you have 10 trades, and you check a tag in the “Daily Report Card” section, all 10 trades will have that tag checked for each of them.
If the “trade” level is “On” and the day” level is “Off” - you will only see your tags in the “Daily trades” section of your journal, and will not see your tags in the “Daily Report Card” section.
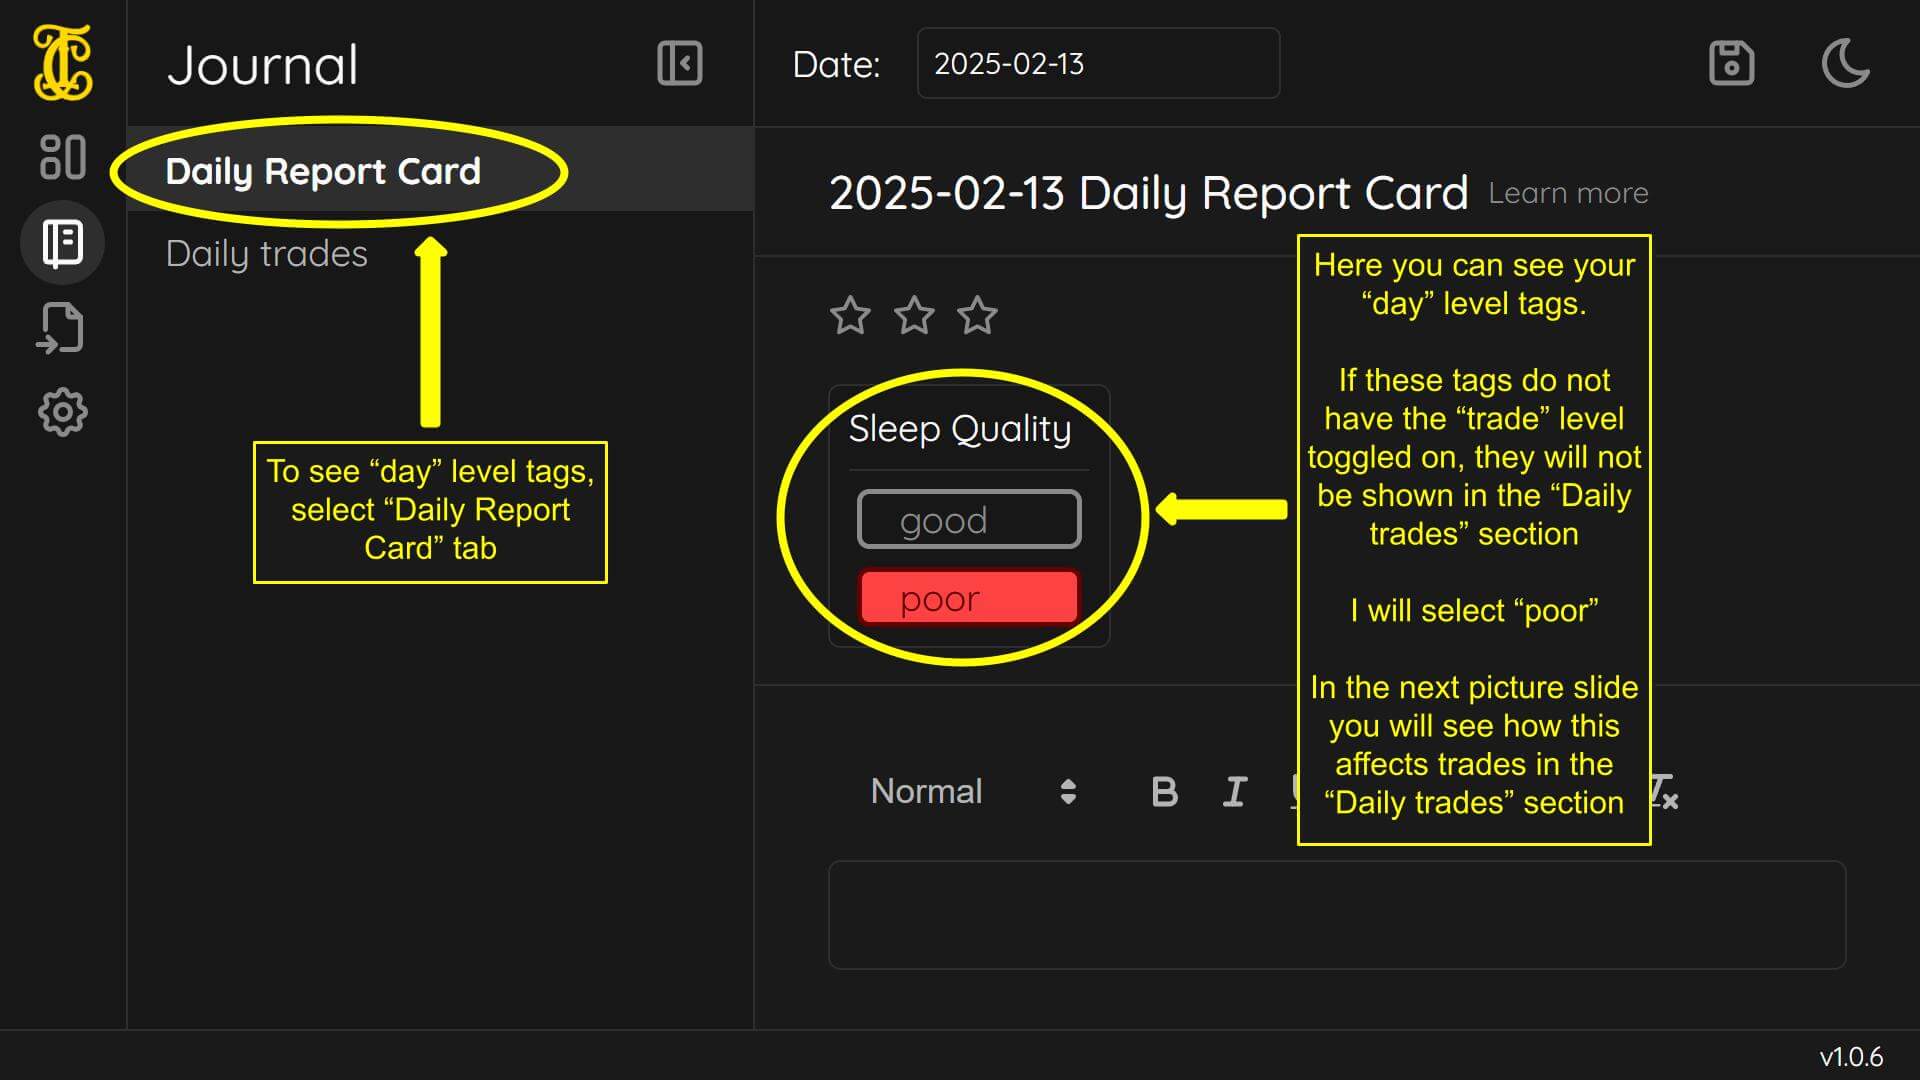
If the “trade” level is “Off” and the day” level is “On” - you will see your tags only in the “Daily Report Card” section and, not the the “Daily trades” section.
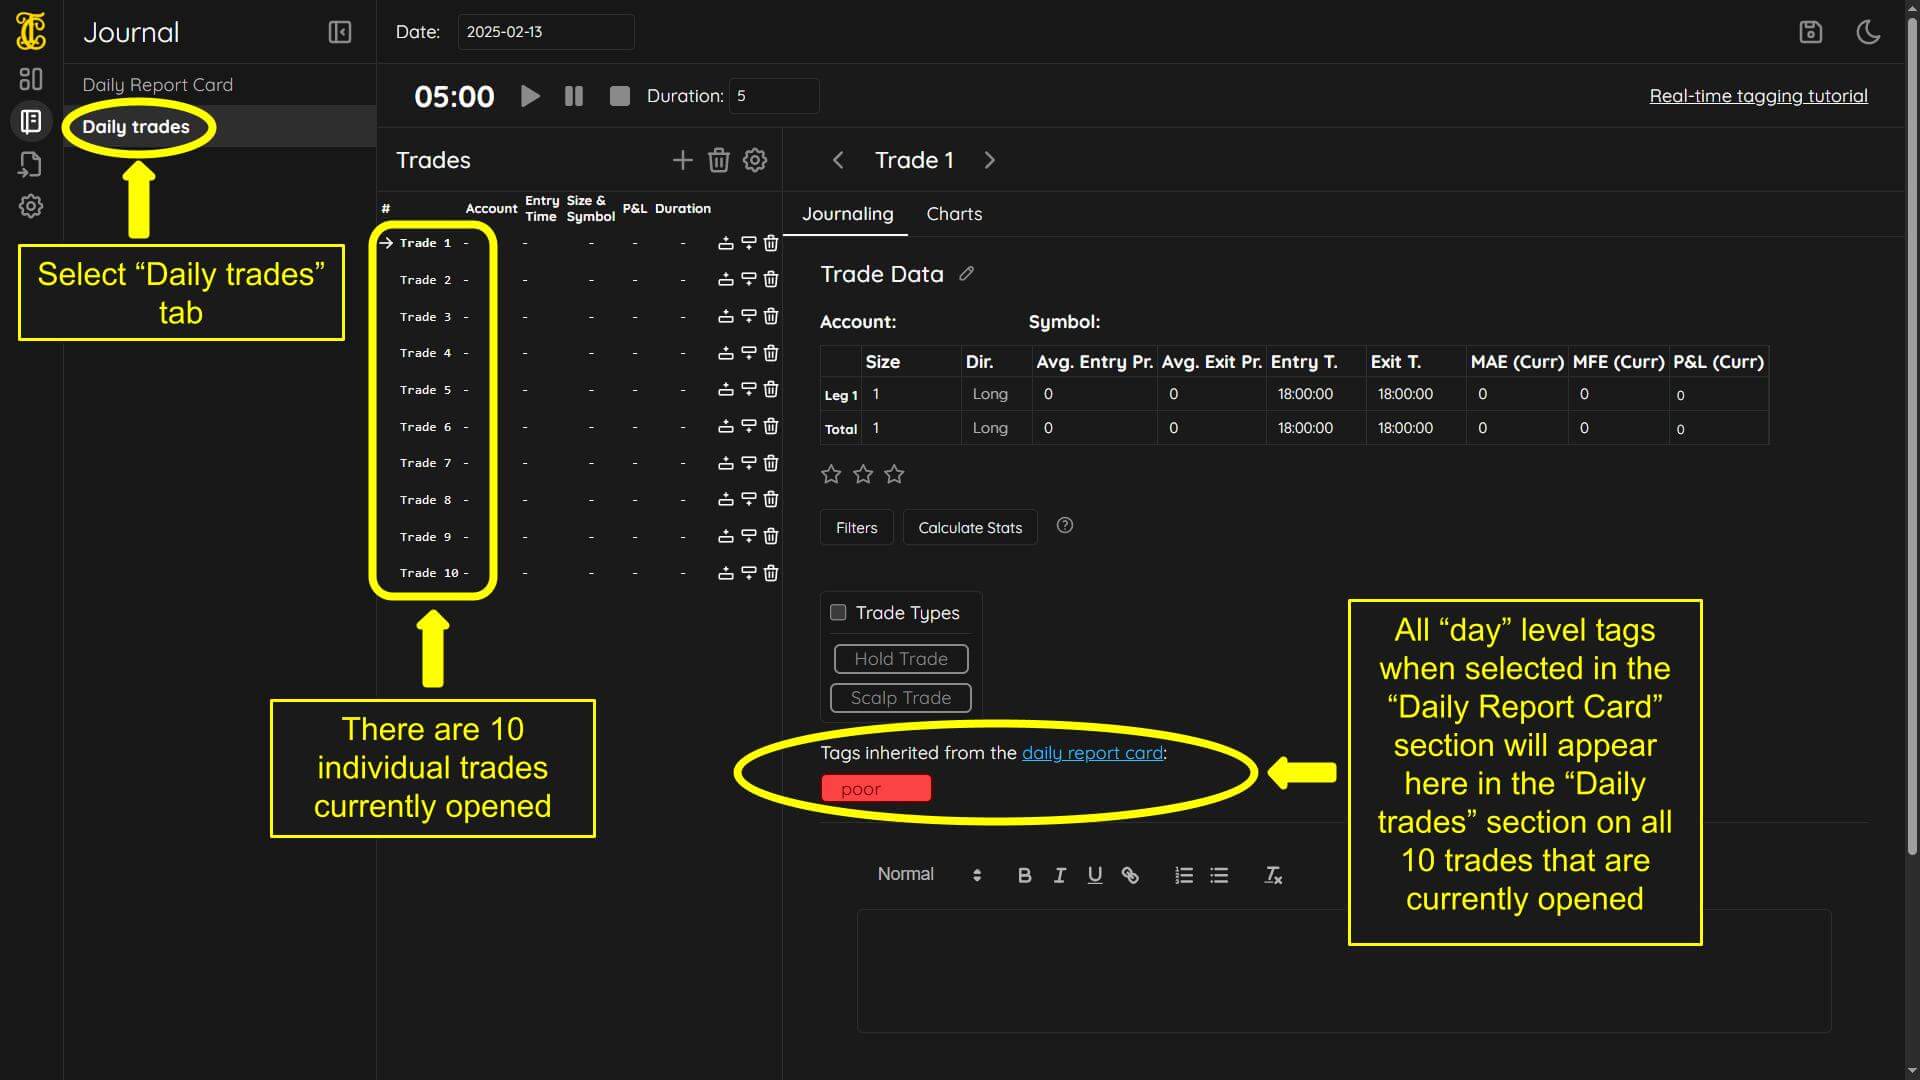
If the “trade” level is “On” and the day” level is “On” - you will see your tags in both the “Daily Report Card” section and “Daily trades” section. Keep in mind the “day” level tags when selected from the “Daily Report Card” section, will toggle every trade with that specific tag in the “Daily trades” section. From the “Daily trades” section, you can only toggle the tag for that specific individual trade. It will not affect all the other trades.
If the “trade” level is “Off” and the “day” level is “Off” - you will not see your tags in the “Daily Report Card” section, and you will not see your tags in the “Daily trades” section.
For the purpose of the screenshots below. There will be a new trade group created for sleep quality. Measuring sleep quality makes sense at a “day” level. Typically your sleep quality will stay the same for every trade taken. For example, if you take 10 trades, instead of selecting “poor” sleep quality on 10 individual trades. You can select it once in the “Daily Report Card” section. All 10 trades will inherit the “poor” sleep quality tag.

Stopwatch timer tag tutorial
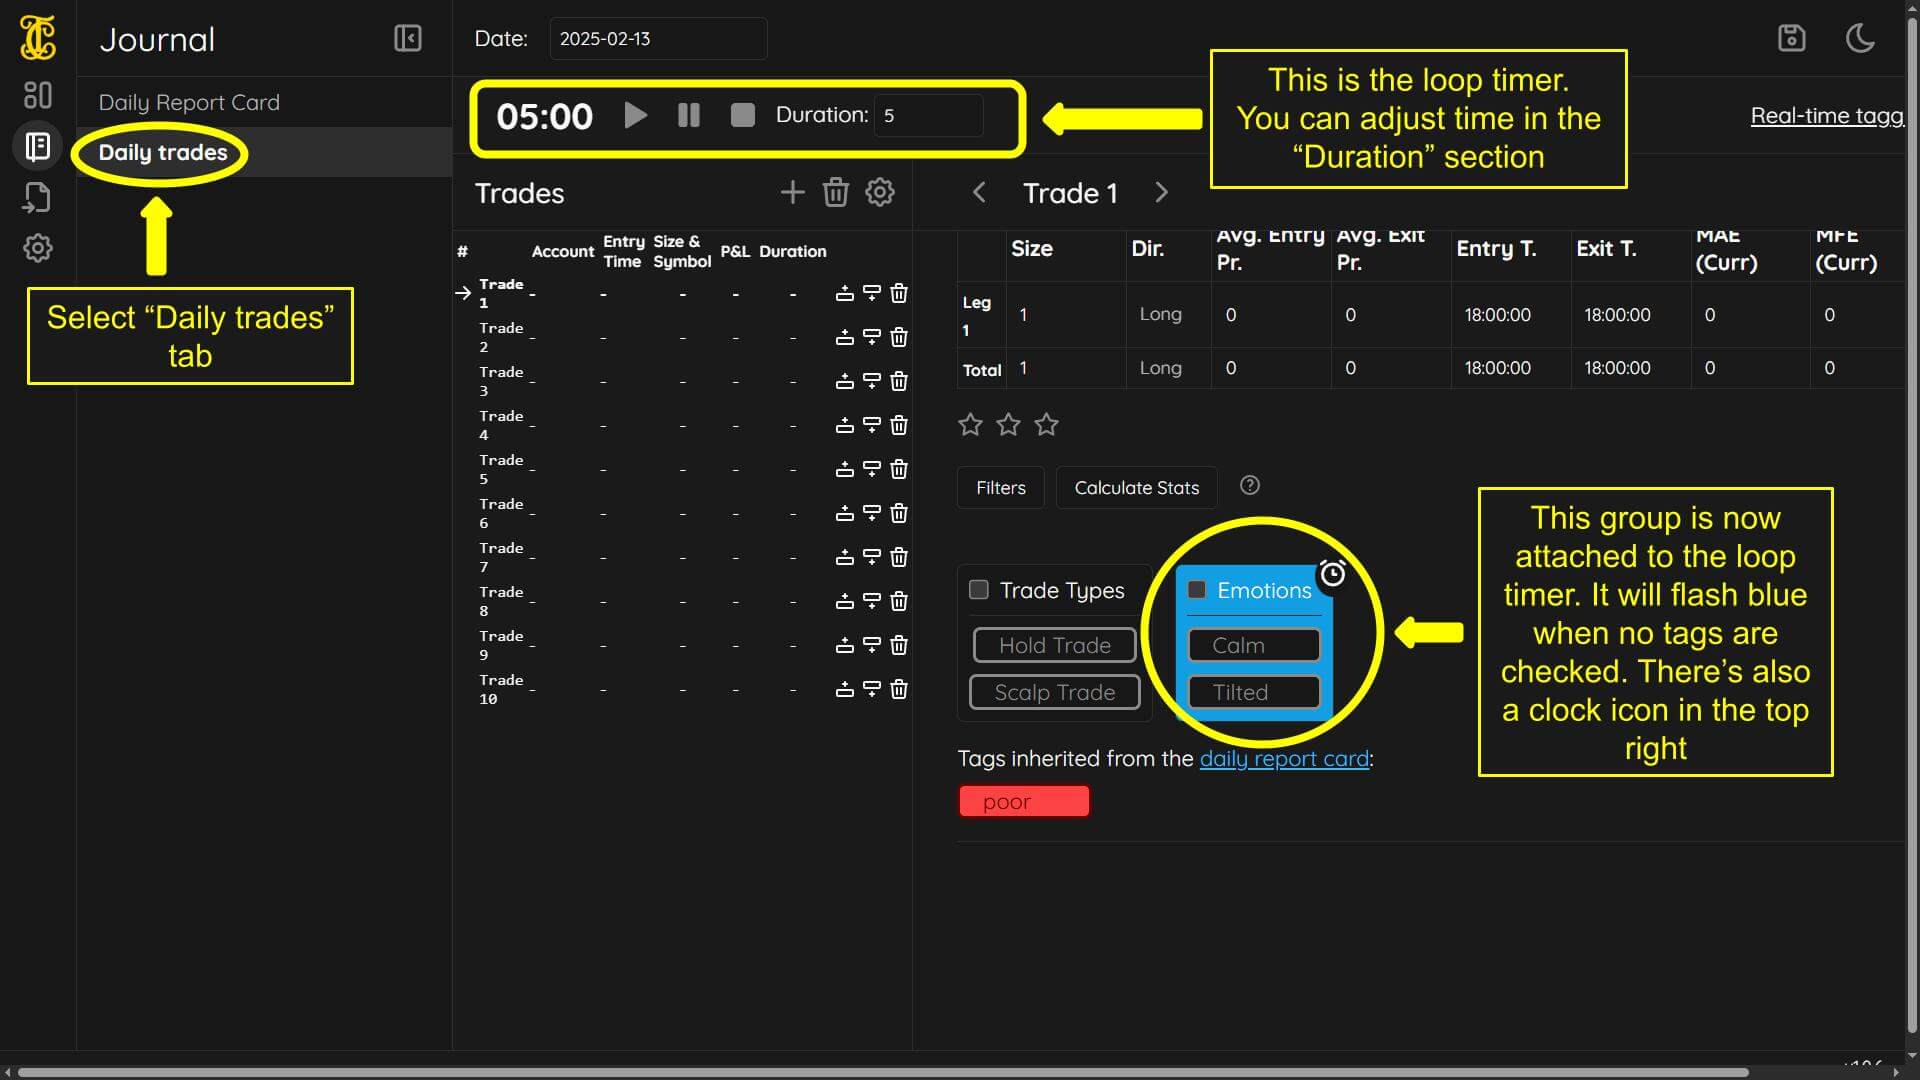
Next we will talk about the “Use with stopwatch timer” setting. The “Use with stopwatch timer” setting attaches your trade group to the built in loop timer in the”Daily trades” section. For example this is useful for when you are trying to check in with emotions every 5 minutes. (The timer can be adjusted in minute increments) This is for traders who want to tag live during a session. To see our “live tagging tutorial” click here.
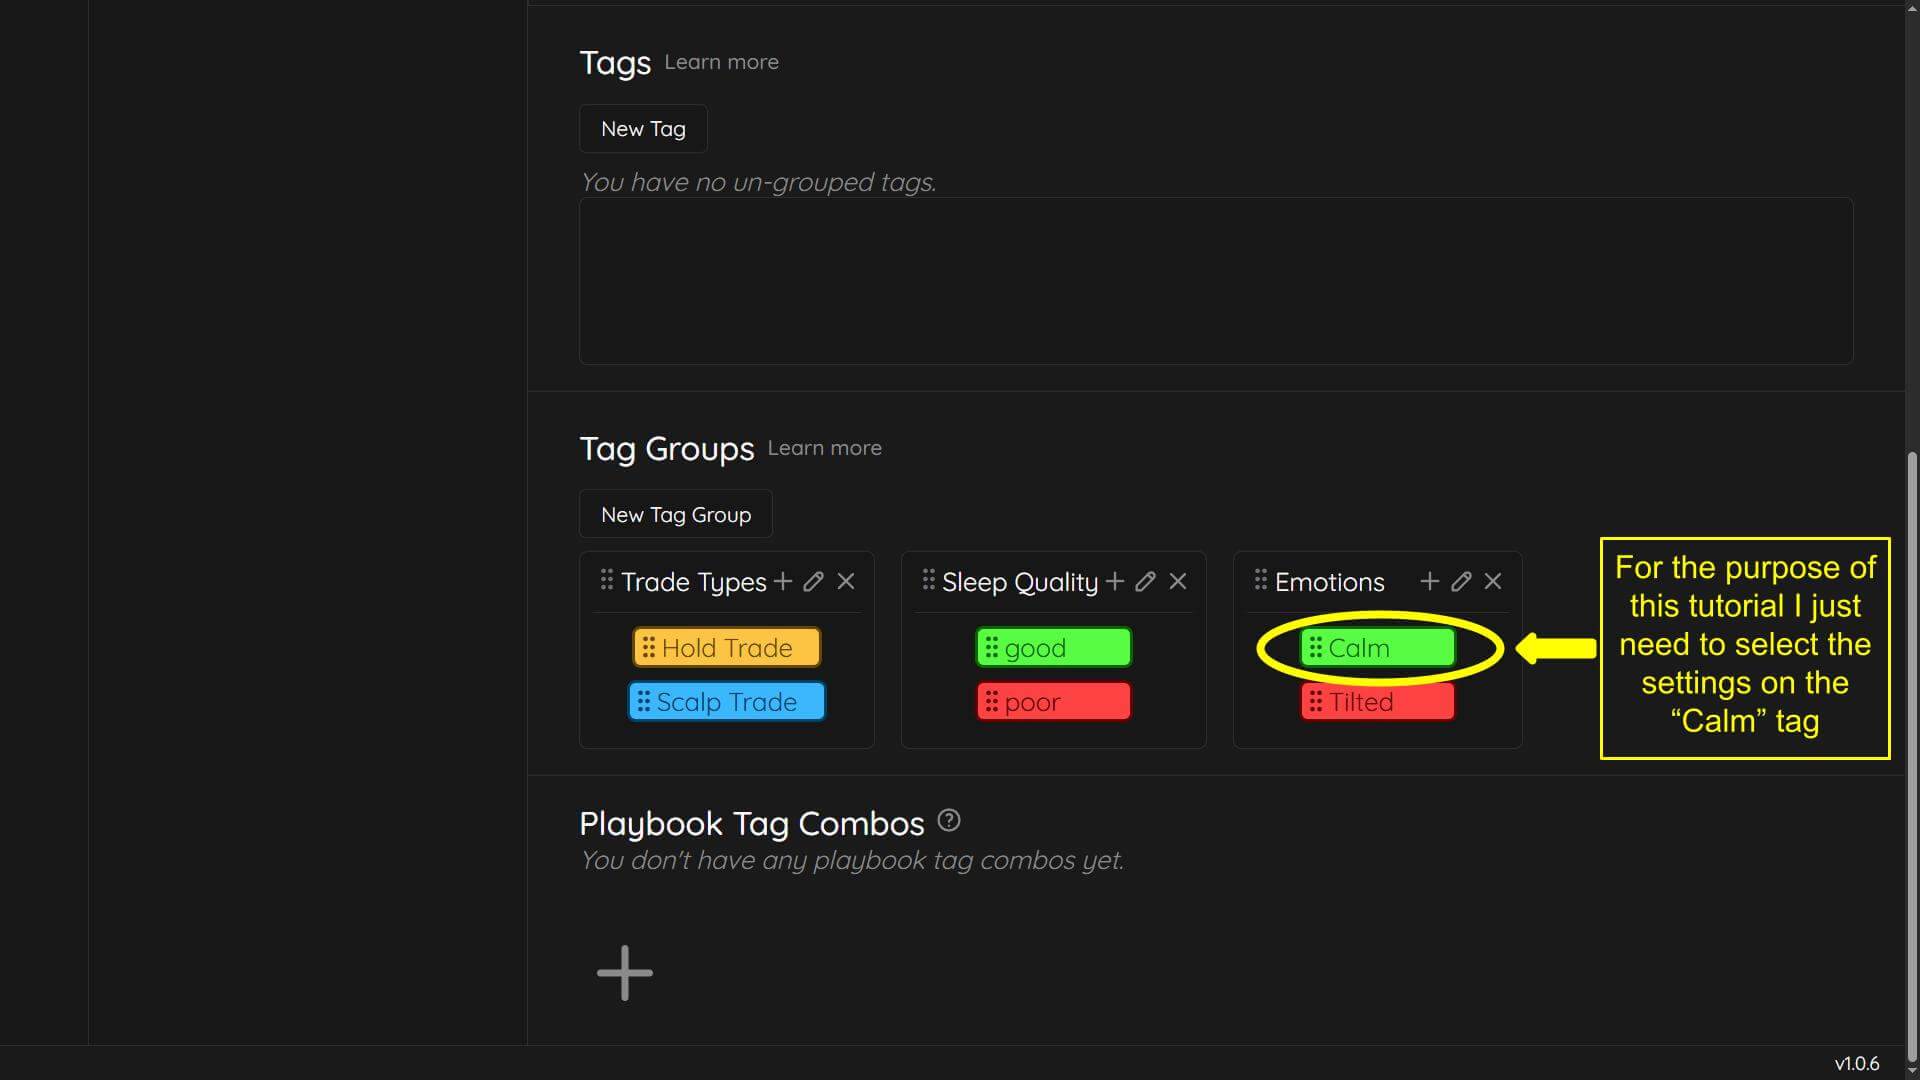
For the purpose of the screen shots below and this section of the tutorial I will create a new trade group called “Emotions”.
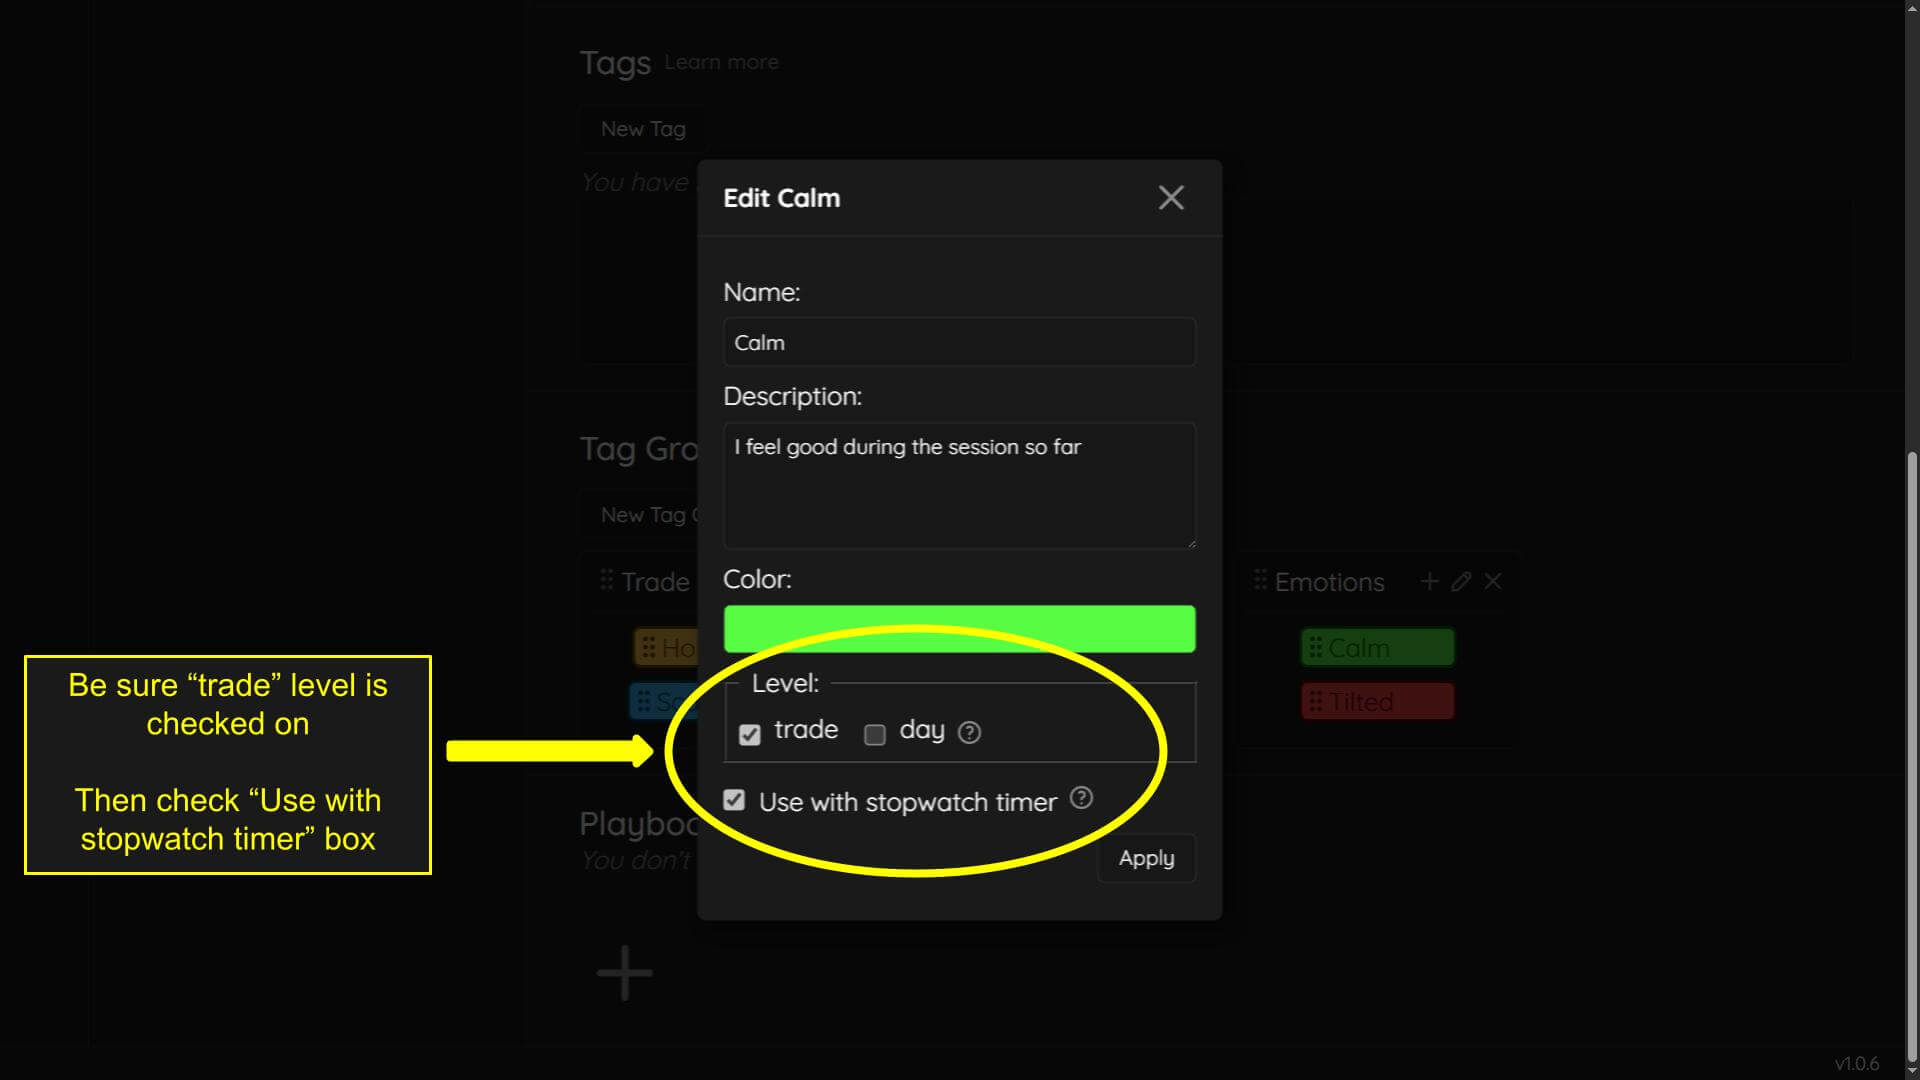
You will only need to select the settings of one tag in this group. We will use the “calm” tag for this part of the tutorial.
You must have the “trade” level box checked to see the option for the “Use with stopwatch timer”. If the “trade” level box is not checked you will not have access to the “Use with stopwatch timer” option.
When you select the “Use with stopwatch timer” option on just one tag in a group - the entire group will be attached to the loop timer. You do not need to select “Use with stopwatch timer” on every tag in the group. The reason for this, is the group itself flashes blue and has a clock icon attached to it. (see images below) The loop timer is not attached to the individual tag, it’s attached to the entire group, through the individual tag.
Once a tag is selected, the blue flashing will stop.
Rearranging groups and tags tutorial
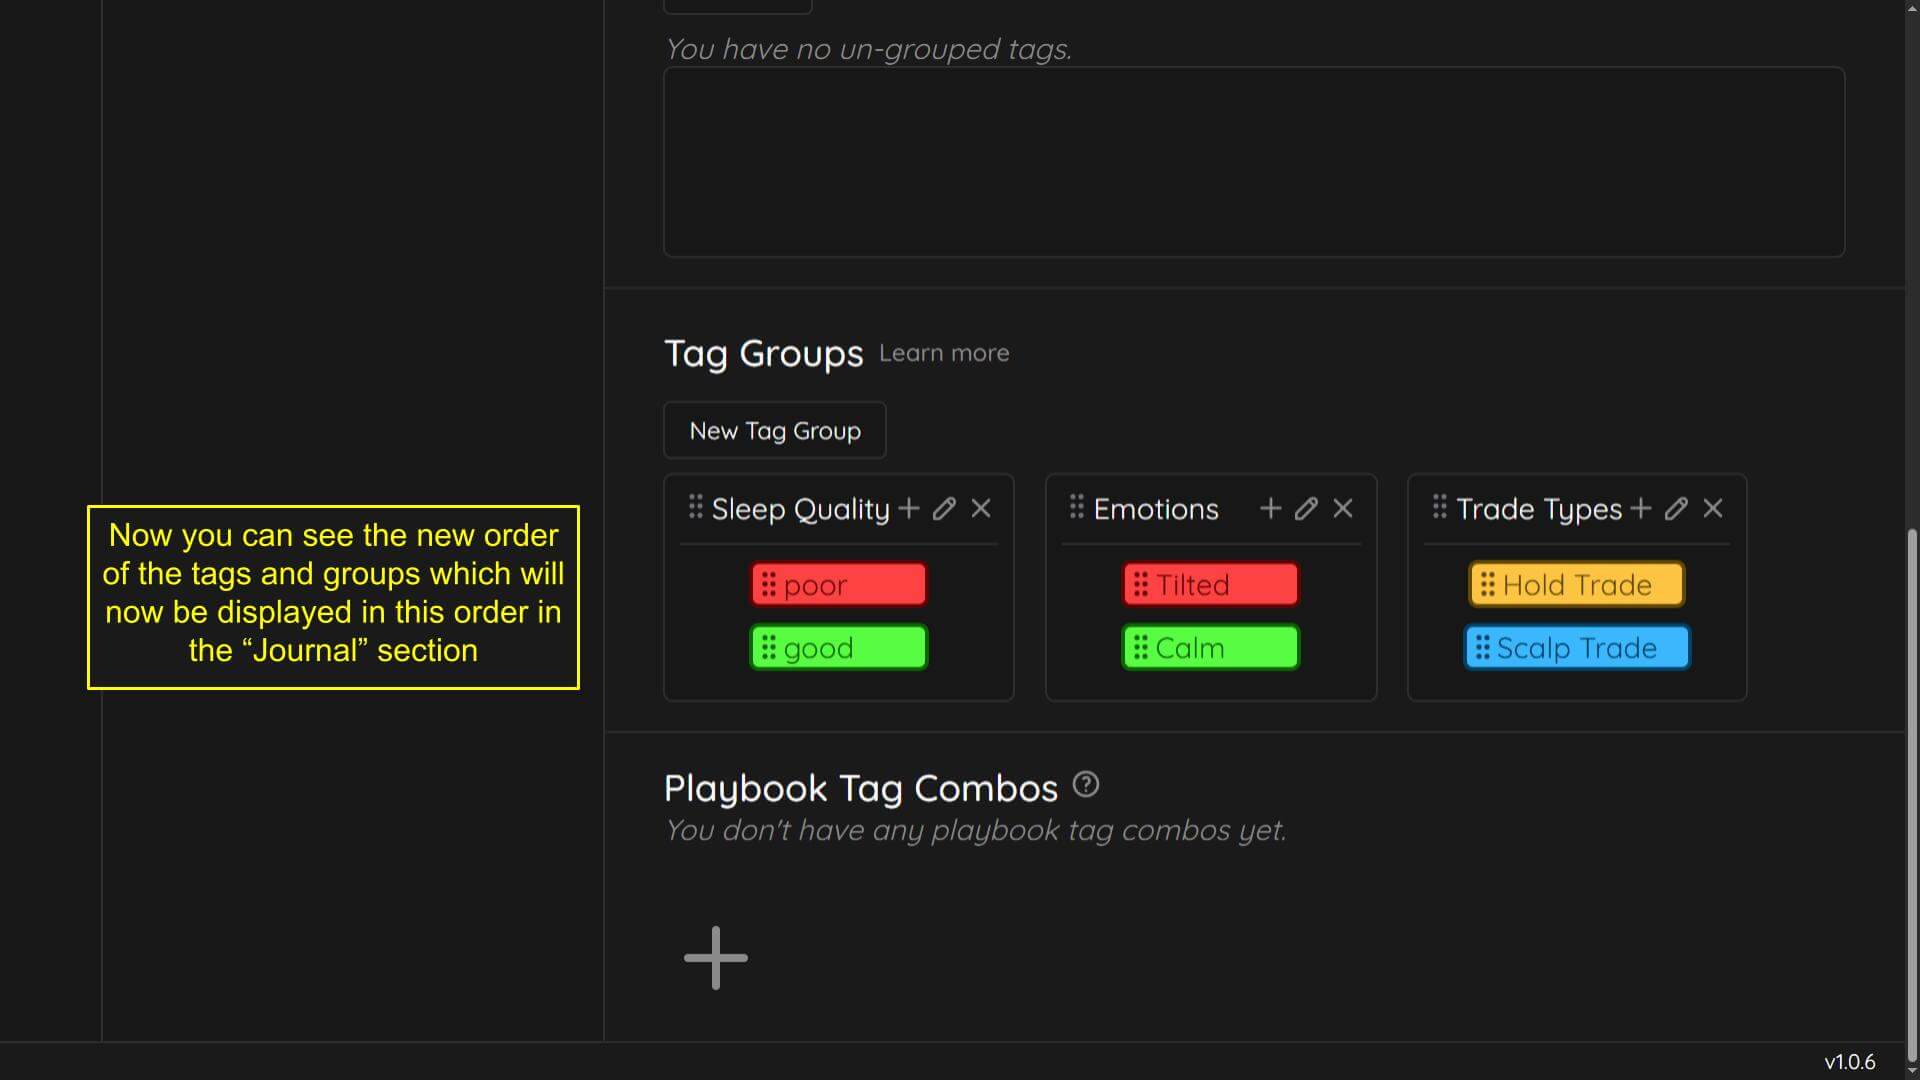
Next we will discuss moving groups and tags. You can re-order your the way your tags and groups are displayed in the “Journal” section.
-Go to the “Settings” section, then “tags”
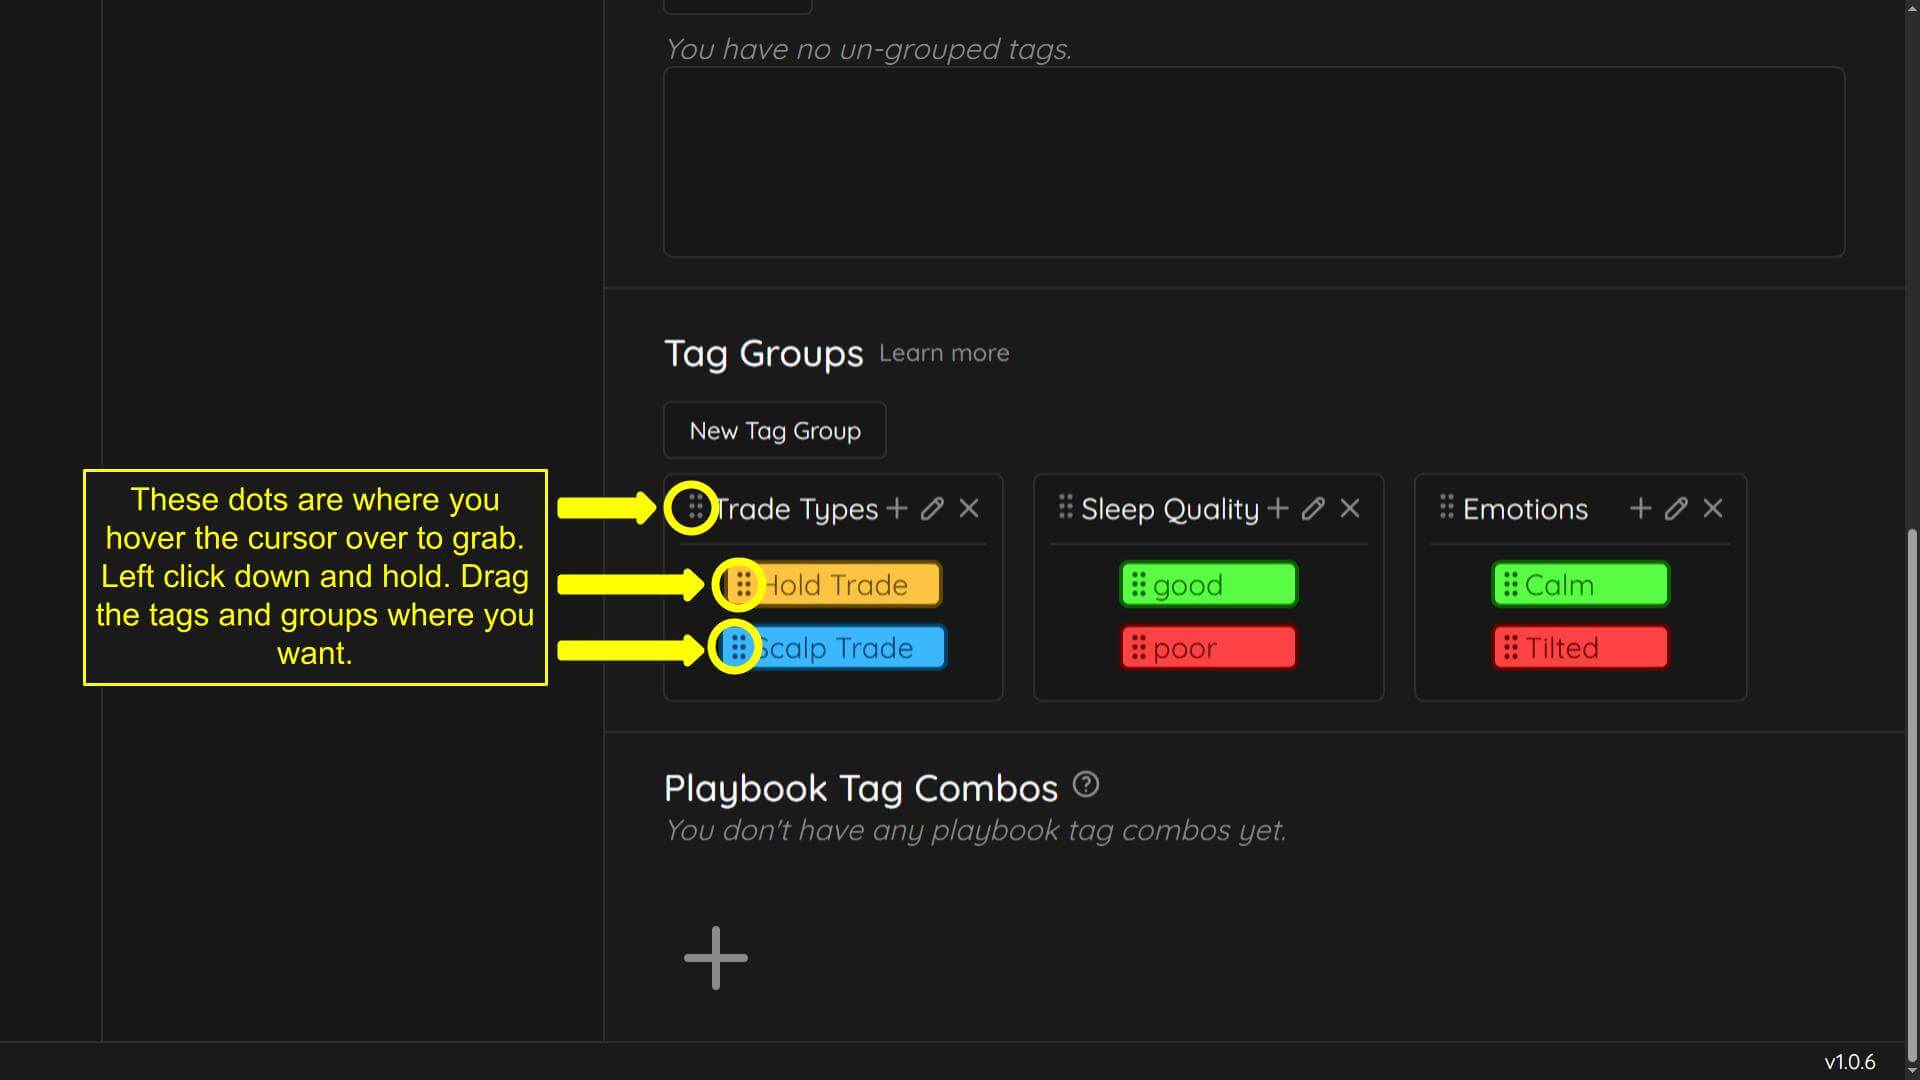
You’ll see 6 small dots next to the group names and tag names. All you need to do is:
-Hover over these dots
-Left click and hold down
-Drag where you want
Deleting tags and groups tutorial
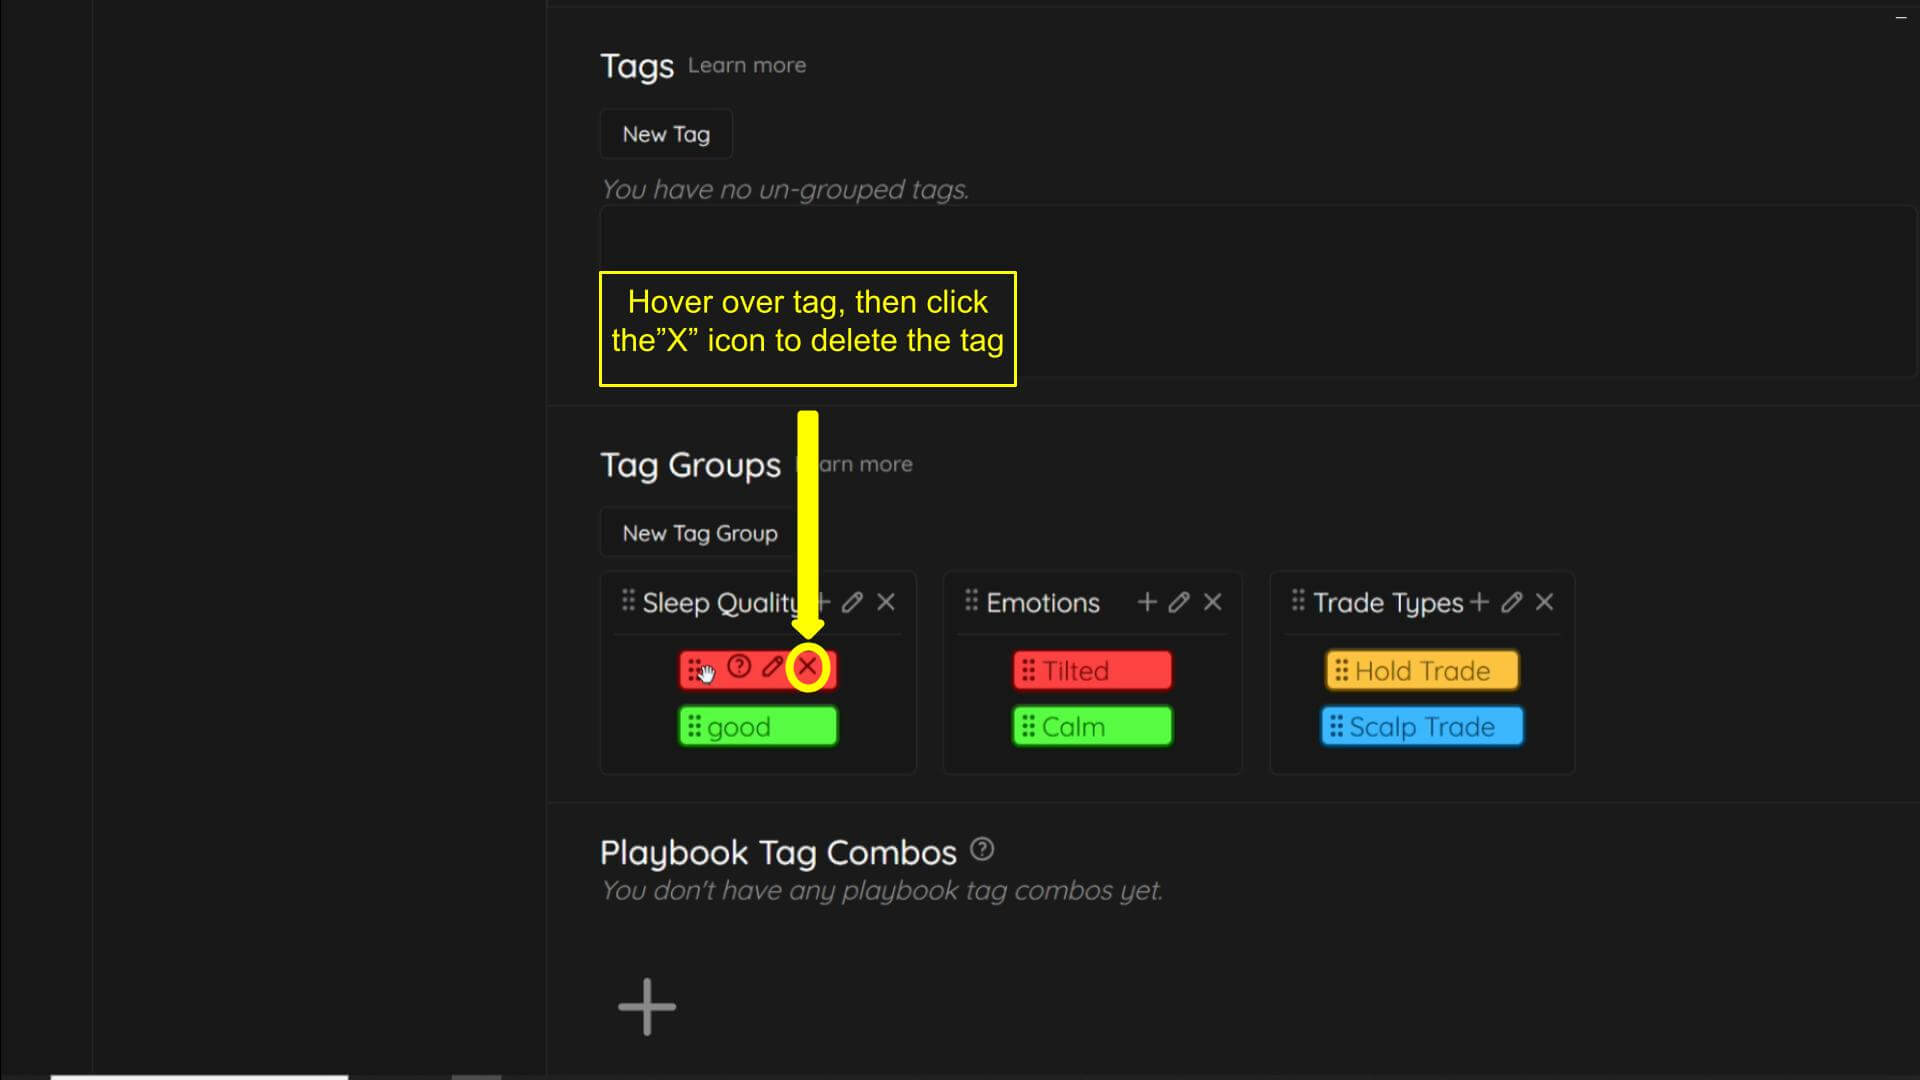
Finally we will discuss deleting tags. Tags can be deleted in the “Settings” section under “Tags”.
-Hover over the tag you wish to delete and 3 icons will pop up
-Click the “X” icon
You will be met with a message:
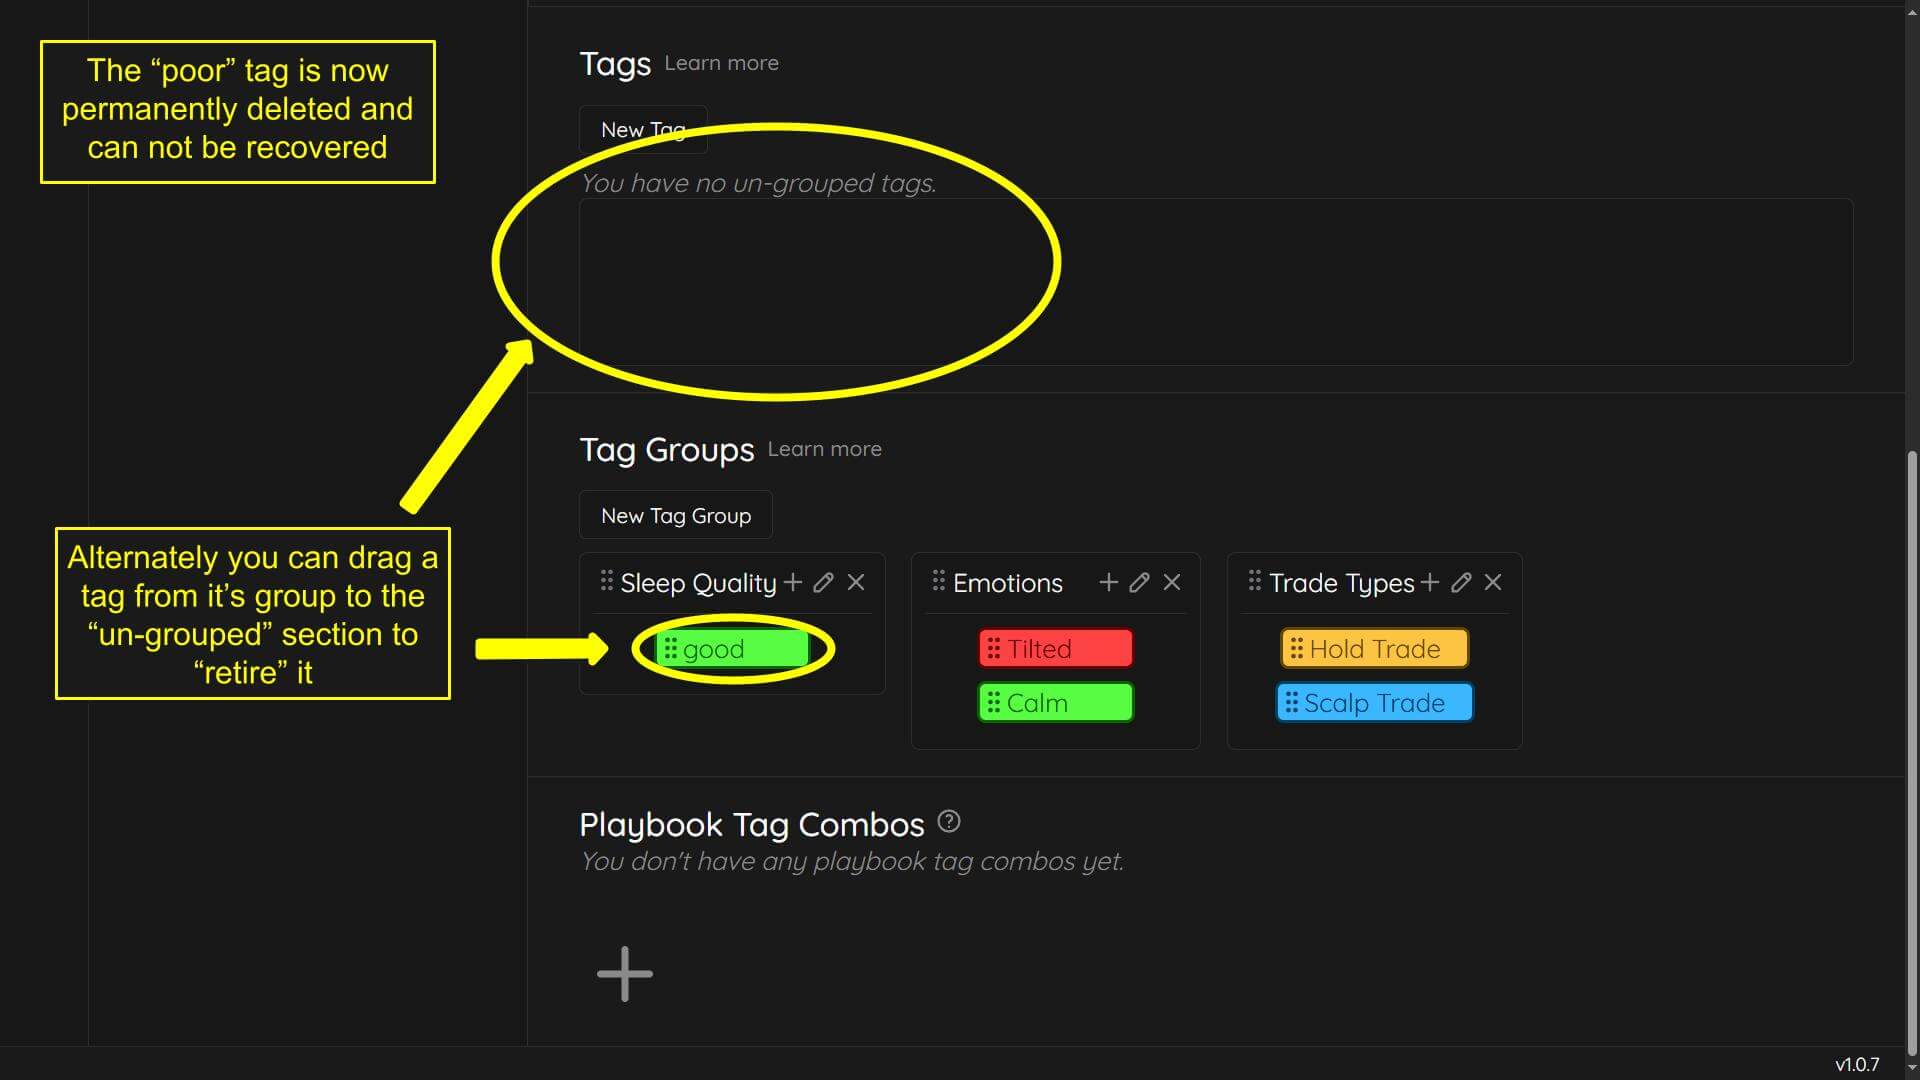
“This tag will be PERMANENTLY DELETED and will be removed from any trade that it is attached to. If you simply want to stop using it, you should drag it to the un-grouped tags section.”
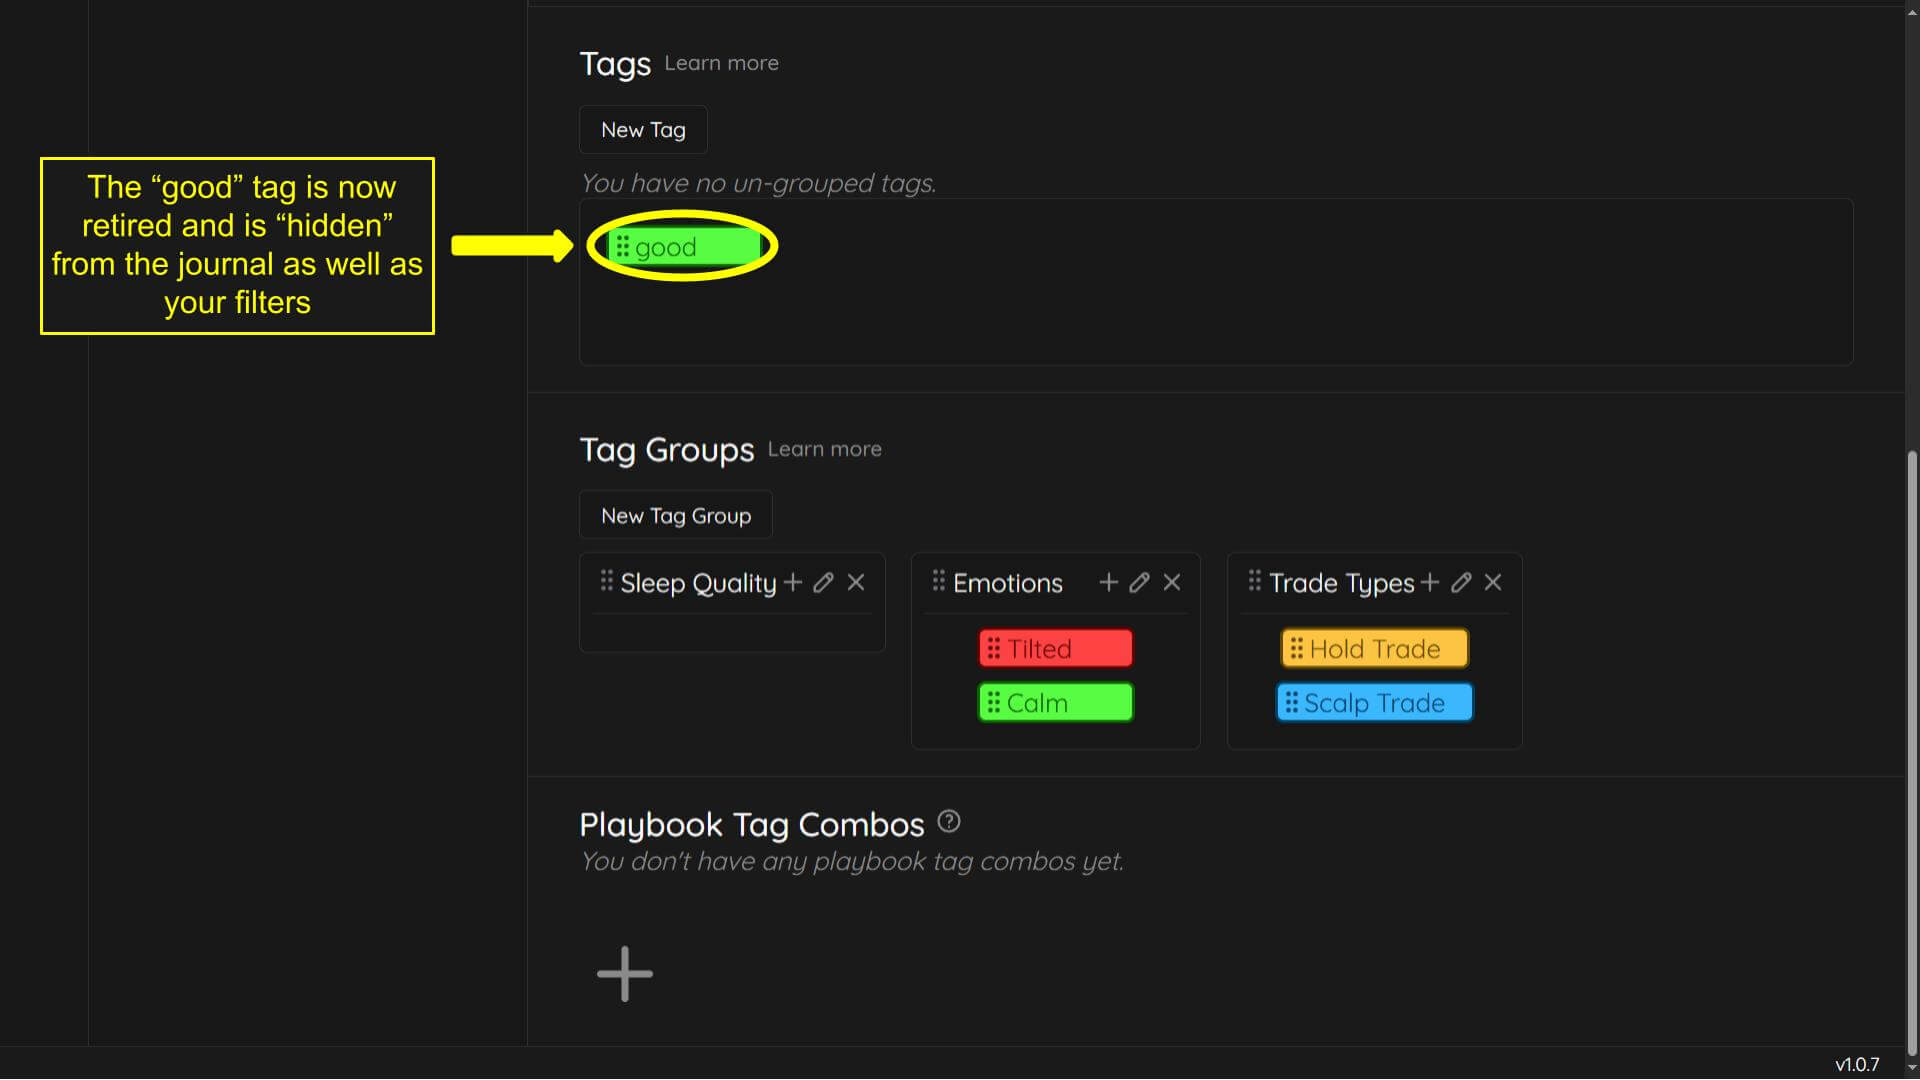
We advise not to delete tags. Especially if you have a large sample size of trades attached to that tag. For example if you have 300 trades attached to that tag, deleting it will erase that tag and all data attached to it. Instead we suggest you drag the tag into the “un-grouped” section. Here it will be “retired”. You will no longer see the tag on your journal or your filters on the main dash. However the tag and attached trades are still there. It is simply hidden when dragged into the “un-grouped” section.
At some point in the future you may want to use this tag again. You can drag it out of the “un-grouped” section back into any group.
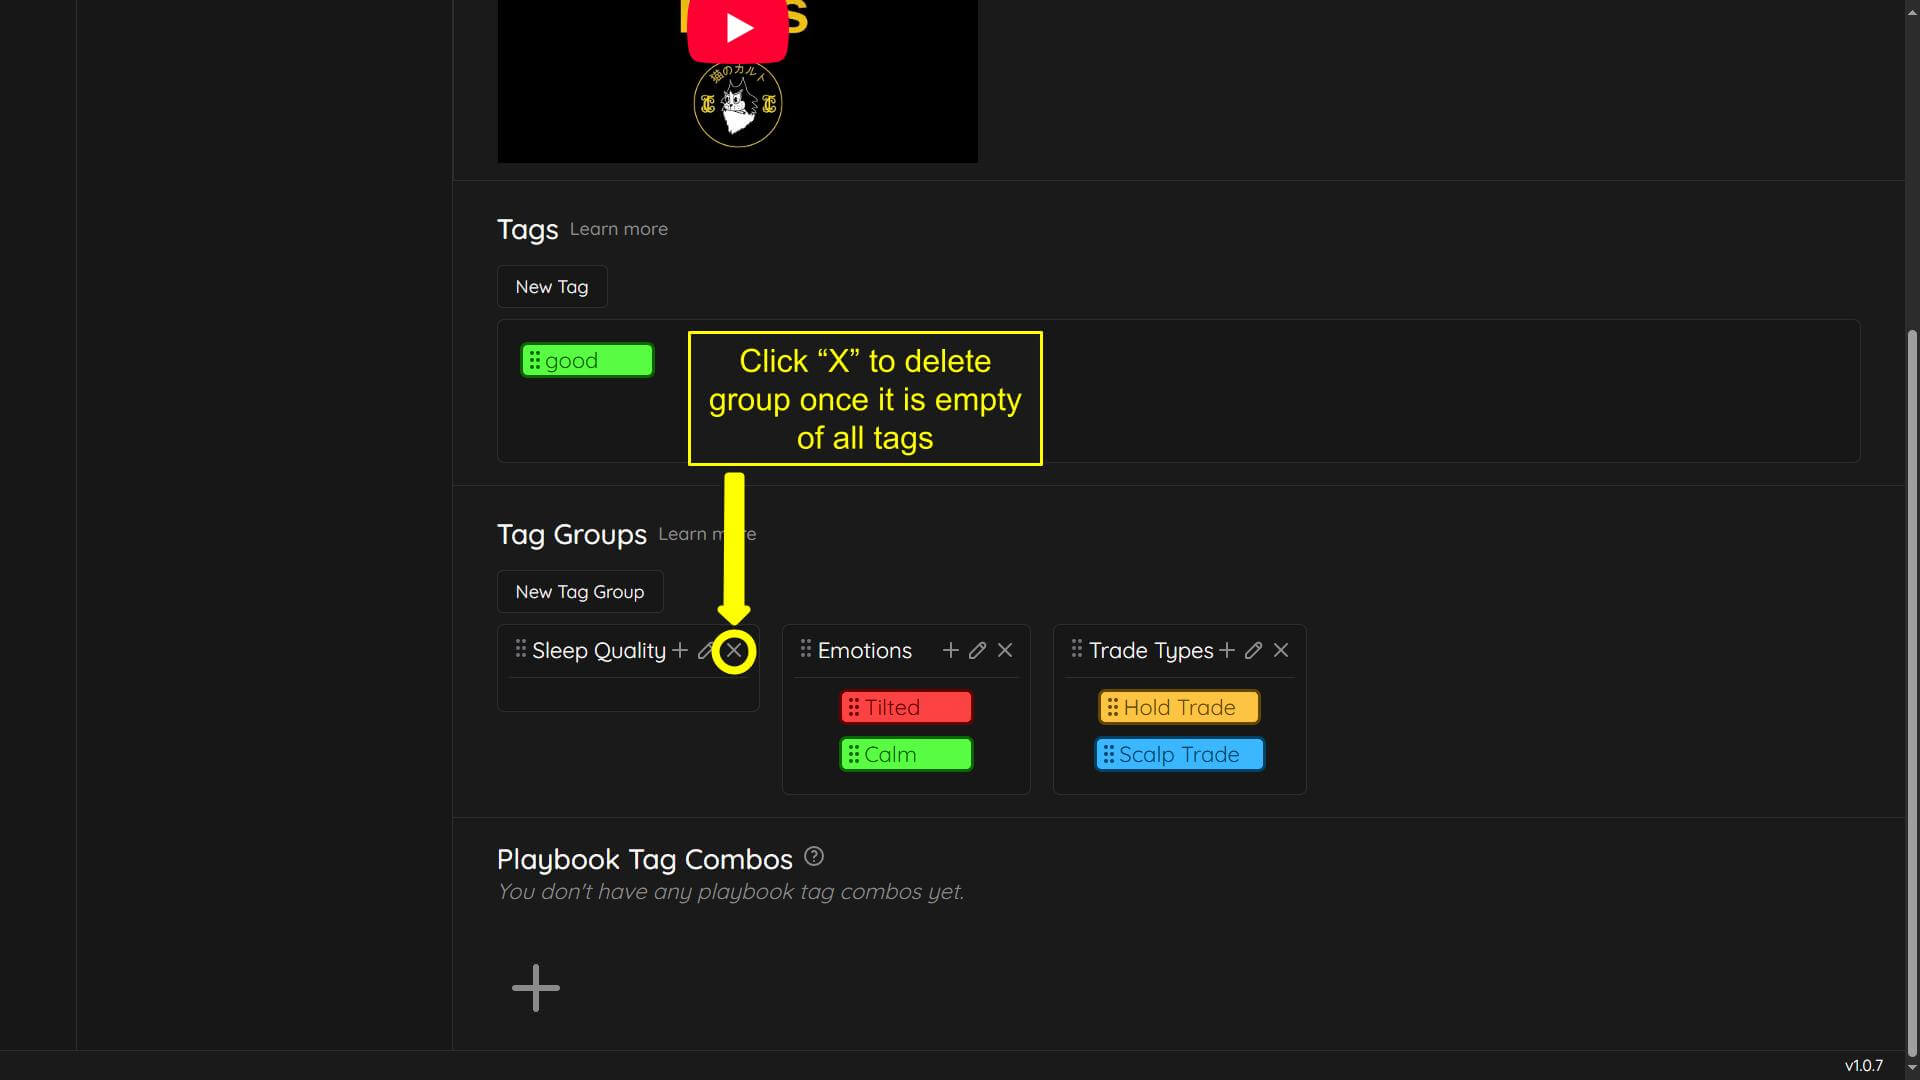
Groups with no tags inside of them will also be hidden from the journal and filters.
When deleting groups you can not delete a group with tags inside of it. A message will pop up saying:
“In order to delete this group, you first need to delete its tags or move them to another group.”
You can delete the tags or drag them to the “un-grouped” section or another group. Once the group you would like to delete is “empty” you can delete it.
Groups are not attached to trades or statistics. You will not lose statistics by deleting groups as trades and statistics are attached to the trade tag itself.
In order to delete a group:
-Click the “X” on the group